
项目简介
该App的核心功能是辅助单词记忆,主要分为三个功能模块,如下图所示
| 模块 | 答题模块 | 打卡圈 | 个人中心 |
|---|---|---|---|
| 图示 | 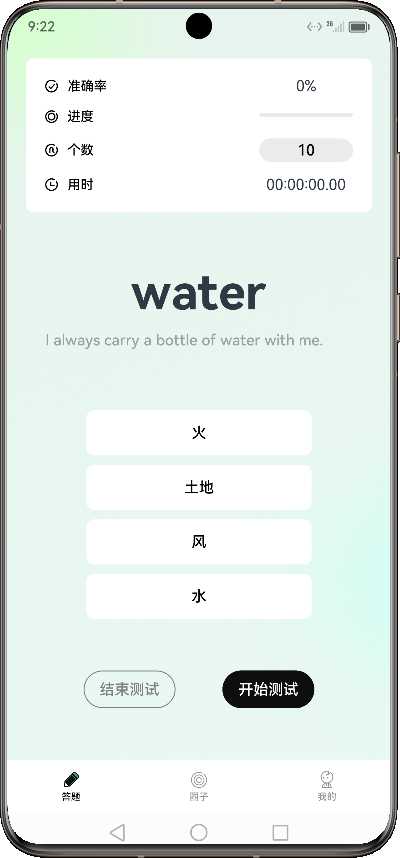 | 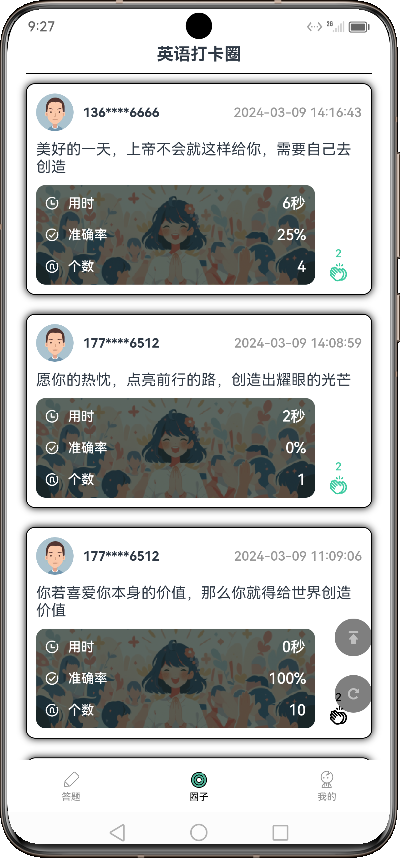 | 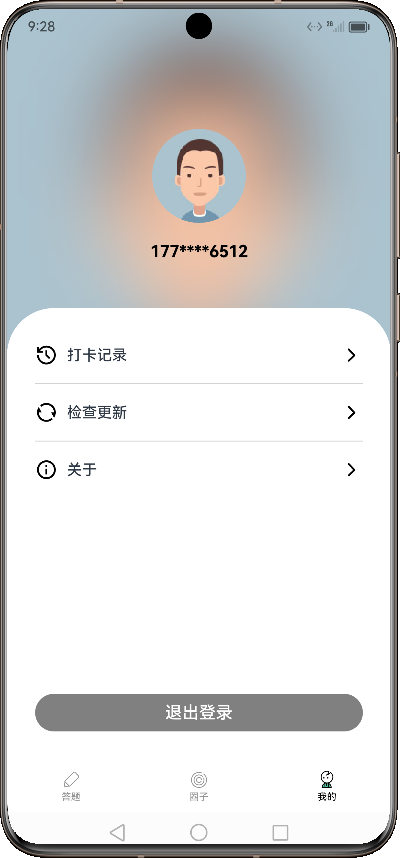 |
| 功能 | 答题、统计、打卡 | 打卡列表、点赞 | 登录、退出登录、个人打卡记录 |
下面逐一完成每个模块
答题页面
功能简介
答题页面共有三个练习状态,分别是答题状态、暂停状态和停止状态。初始状态为停止状态,停止状态下不可答题,此时点击答案选项,需要给出提示,如下图所示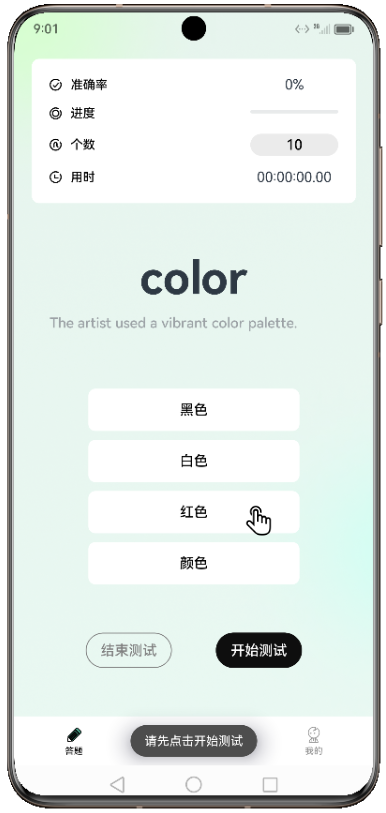
在停止状态下,可以修改测试的单词个数(其余状态下均不可修改),如下图所示。个数修改后,需要从题库中重新抽取相应个数的题目。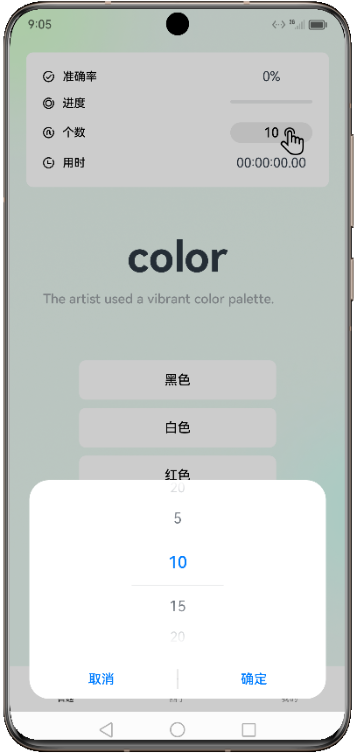
点击开始测试按钮即可进入答题状态,此时,计时器开始计时,
答题操作的逻辑如下图所示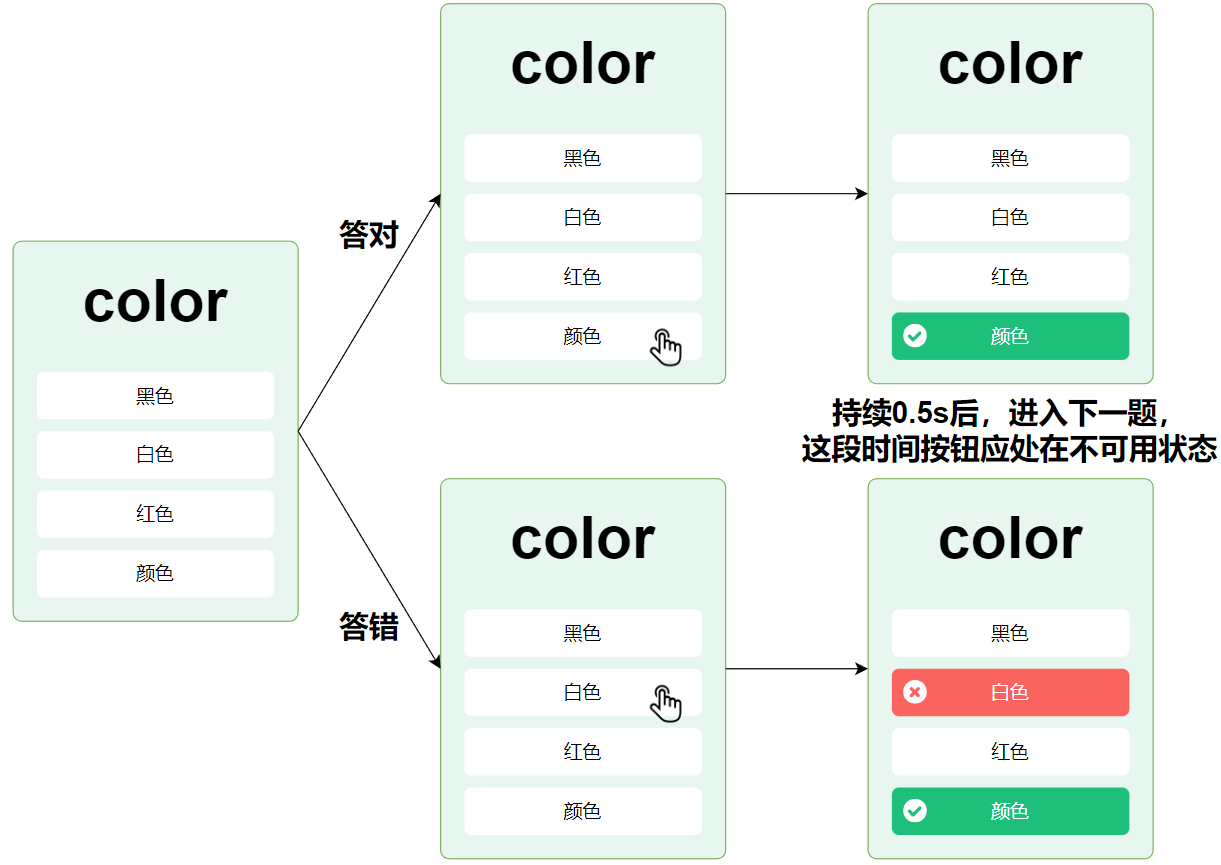
答题过程中需要实时更新统计信息,统计指标包括进度和准确率,如下图所示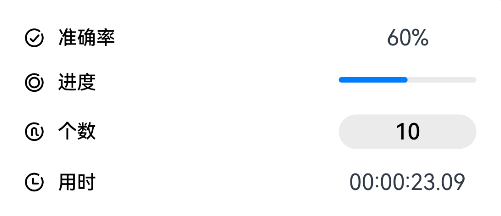
答题过程中点击暂停测试按钮可进入暂停状态,暂停状态下,计时器停止计时。
再次点击开始测试,重新进入答题状态,计时器恢复计时。
当本轮测试题目全部完成或者提前点击结束测试按钮,进入停止状态,并弹窗显示统计结果,如下图所示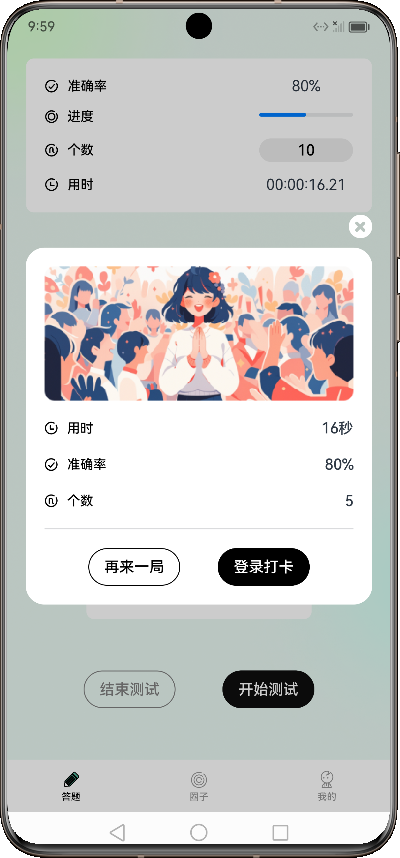
此时,
点击右上角关闭按钮,弹窗关闭,同时测试题目和统计信息重置,答题页面回到初始状态。
点击再来一局按钮,弹窗关闭,同时测试题目和统计信息重置,然后直接进入答题状态。
点击登录打卡按钮,弹窗关闭,同时测试题目和统计信息重置,然后跳转到到登录页面。
实现思路
所需技能
答题模块所需技能如下
:::success
- 常用布局的使用:Column、Row等等
- 常用组件的使用:Progress、Button、Image、Text、TextTimmer(计时器)等等
- 自定义组件
- 自定义弹窗
- 组件状态管理:@State、@Prop、@Link、@Watch等等
:::
上述内容可参考HarmonyOS 4.0 应用开发中的第3、4、5章。
实现过程
基础布局和样式
答题页面的基本布局如下图所示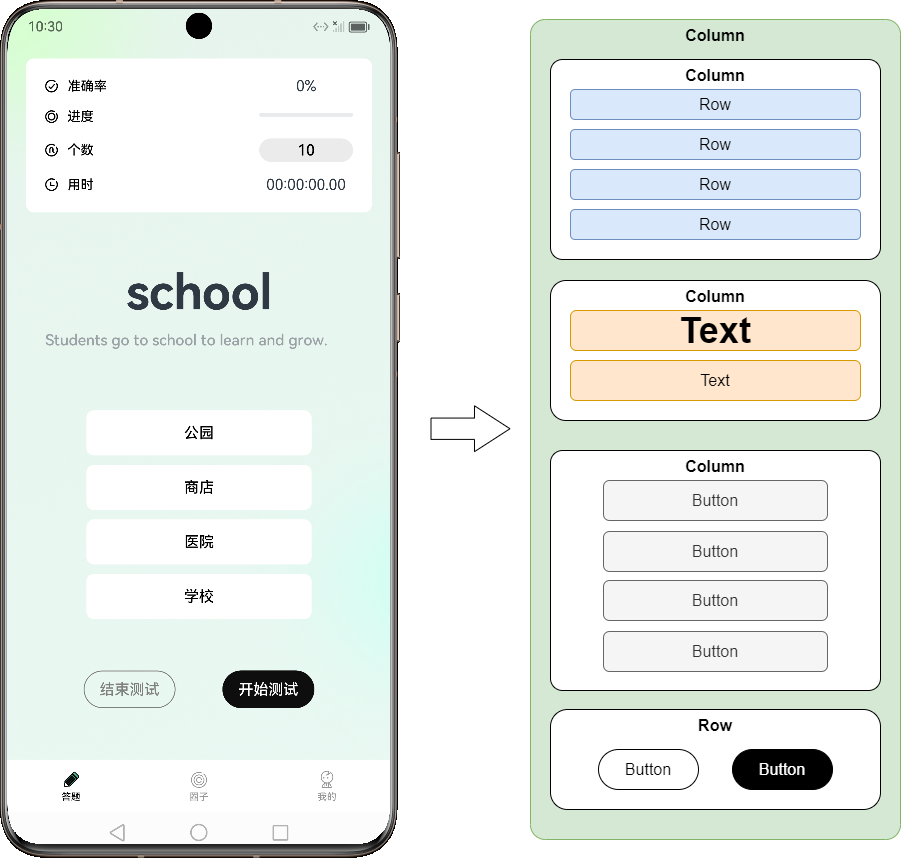
各组件样式如下
| 组件 | 样式 | 效果 |
|---|---|---|
| 页面背景 | `arkts | |
| @Extend(Column) function practiceBgStyle() { | ||
| .width('100%') | ||
| .height('100%') | ||
| .backgroundImage($r('app.media.img_practice_bg')) | ||
| .backgroundImageSize({ width: '100%', height: '100%' }) | ||
| .justifyContent(FlexAlign.SpaceEvenly) | ||
| } |
|  |
| 统计面板背景 | ```arkts
@Styles function statBgStyle() {
.backgroundColor(Color.White)
.width('90%')
.borderRadius(10)
.padding(20)
}|  |
|
| 单词 | `arkts
@Extend(Text) function wordStyle() {
.fontSize(50)
.fontWeight(FontWeight.Bold)
}
|  |
| 例句 | ```arkts
@Extend(Text) function sentenceStyle() {
.height(40)
.fontSize(16)
.fontColor('#9BA1A5')
.fontWeight(FontWeight.Medium)
.width('80%')
.textAlign(TextAlign.Center)
}|  |
|
| 选项按钮 | `arkts
@Extend(Button) function optionButtonStyle(color: {
bg: ResourceColor,
font: ResourceColor
}) {
.width(240)
.height(48)
.fontSize(16)
.type(ButtonType.Normal)
.fontWeight(FontWeight.Medium)
.borderRadius(8)
.backgroundColor(color.bg)
.fontColor(color.font)
}
|  |
| 控制按钮 | ```arkts
@Extend(Button) function controlButtonStyle(color: {
bg: ResourceColor,
border: ResourceColor,
font: ResourceColor
}) {
.fontSize(16)
.borderWidth(1)
.backgroundColor(color.bg)
.borderColor(color.border)
.fontColor(color.font)
}|  |
|
练习状态
练习状态共有三个分别是答题状态、暂停状态和停止状态,我们可以定义一个枚举类型来表示三个状态,如下
export enum PracticeStatus {
  Running, //答题状态
  Paused, //暂停状态
  Stopped //停止状态
}
之后定义一个上述枚举类型的状态变量表示当前所处的练习状态,如下
@State practiceStatus: PracticeStatus = PracticeStatus.Stopped练习状态的控制通过底部的两个控制按钮实现,需要注意的是两个按钮在不同的状态下也应呈现不同的样式,如下图
| 练习状态 | 停止状态 | 答题状态 | 暂停状态 |
|---|---|---|---|
| 效果 |  |  |  |
具体内容可参考如下代码
Button('停止测试')
  .controlButtonStyle({
    bg: Color.Transparent,
    border: this.practiceStatus === PracticeStatus.Stopped ? Color.Gray : Color.Black,
    font: this.practiceStatus === PracticeStatus.Stopped ? Color.Gray : Color.Black
  })
  .enabled(this.practiceStatus !== PracticeStatus.Stopped)

Button(this.practiceStatus === PracticeStatus.Running ? '暂停测试' : '开始测试')
  .controlButtonStyle({
    bg: this.practiceStatus === PracticeStatus.Running ? '#555555' : Color.Black,
    border: this.practiceStatus === PracticeStatus.Running ? '#555555' : Color.Black,
    font: Color.White
  })
  .stateEffect(false)
另外还需为两个按钮绑定点击事件,来处理练习状态的变化。
切题逻辑
切题效果通过两个状态变量实现,一个是题目数组,一个是数组索引,数组保存的是本轮测试的全部题目,索引是指当前题目的索引,如下图所示,只需修改currentIndex,就能实现切题的效果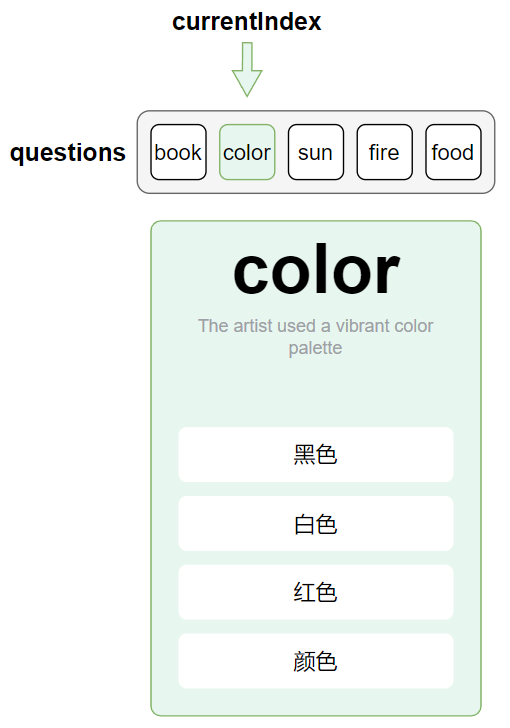
题目数据的类型定义如下:
export interface Question {
  word: string; //单词
  sentence: string; //例句
  options: string[]; //选项
  answer: string; //答案
}

//题库
export const questionData: Question[] = [
  {
    word: "book",
    options: ["书籍", "笔", "橡皮", "背包"],
    answer: "书籍",
    sentence: "I love to read a good book every night."
  },
  {
    word: "computer",
    options: ["电视", "电脑", "手机", "相机"],
    answer: "电脑",
    sentence: "I use the computer for work and entertainment."
  },
  {
    word: "apple",
    options: ["香蕉", "桃子", "梨", "苹果"],
    answer: "苹果",
    sentence: "She enjoys eating a crisp apple in the afternoon."
  },
  {
    word: "sun",
    options: ["月亮", "太阳", "星星", "地球"],
    answer: "太阳",
    sentence: "The sun provides warmth and light to our planet."
  },
  {
    word: "water",
    options: ["火", "土地", "风", "水"],
    answer: "水",
    sentence: "I always carry a bottle of water with me."
  },
  {
    word: "mountain",
    options: ["沙漠", "海洋", "平原", "山"],
    answer: "山",
    sentence: "The mountain range is covered in snow during winter."
  },
  {
    word: "flower",
    options: ["树木", "草地", "花", "灌木"],
    answer: "花",
    sentence: "The garden is filled with colorful flowers."
  },
  {
    word: "car",
    options: ["自行车", "飞机", "船", "汽车"],
    answer: "汽车",
    sentence: "I drive my car to work every day."
  },
  {
    word: "time",
    options: ["空间", "时钟", "日历", "时间"],
    answer: "时间",
    sentence: "Time flies when you're having fun."
  },
  {
    word: "music",
    options: ["画", "舞蹈", "音乐", "戏剧"],
    answer: "音乐",
    sentence: "Listening to music helps me relax."
  },
  {
    word: "rain",
    options: ["雪", "雷电", "阳光", "雨"],
    answer: "雨",
    sentence: "I enjoy the sound of rain tapping on the window."
  },
  {
    word: "fire",
    options: ["冰", "火焰", "烟雾", "闪电"],
    answer: "火焰",
    sentence: "The campfire warmed us on a chilly evening."
  },
  {
    word: "friend",
    options: ["陌生人", "邻居", "家人", "朋友"],
    answer: "朋友",
    sentence: "A true friend is always there for you."
  },
  {
    word: "food",
    options: ["水果", "蔬菜", "肉", "食物"],
    answer: "食物",
    sentence: "Healthy food is essential for a balanced diet."
  },
  {
    word: "color",
    options: ["黑色", "白色", "红色", "颜色"],
    answer: "颜色",
    sentence: "The artist used a vibrant color palette."
  },
  {
    word: "bookshelf",
    options: ["椅子", "桌子", "书架", "床"],
    answer: "书架",
    sentence: "The bookshelf is filled with novels and reference books."
  },
  {
    word: "moon",
    options: ["太阳", "星星", "月亮", "地球"],
    answer: "月亮",
    sentence: "The moonlight illuminated the night sky."
  },
  {
    word: "school",
    options: ["公园", "商店", "医院", "学校"],
    answer: "学校",
    sentence: "Students go to school to learn and grow."
  },
  {
    word: "shoes",
    options: ["帽子", "衣服", "裤子", "鞋子"],
    answer: "鞋子",
    sentence: "She bought a new pair of stylish shoes."
  },
  {
    word: "camera",
    options: ["电视", "电脑", "相机", "手机"],
    answer: "相机",
    sentence: "The photographer captured the moment with his camera."
  }
]

//从题库中随机抽取n个题目
export function getRandomQuestions(count: number) {
  let length = questionData.length;

  let indexes: number[] = [];
  while (indexes.length < count) {
    let index = Math.floor(Math.random() * length);
    if (!indexes.includes(index)) {
      indexes.push(index)
    }
  }
  return indexes.map(index => questionData[index])
}
:::success
注意:切换题目时需要考虑延时切换,并且在延时的这段时间内,选项按钮应该处在不可用的状态。
:::
判断正误
判断正误的逻辑相对比较复杂,下面逐步实现
第一步:自定义选项按钮组件
作答正确与否需要通过选项按钮的样式来体现,整体来看选项按钮共有三种样式,如下图所示
| 状态 | 默认 | 正确 | 错误 |
|---|---|---|---|
| 效果 |  |  |  |
| 按钮样式参考 | 背景颜色:Color.White | ||
字体颜色:Color.Black | 背景颜色:#1DBF7B | ||
字体颜色:Color.White | 背景颜色:#FA635F | ||
字体颜色:Color.White | |||
| 图标样式参考 | `arkts | ||
| .width(22) | |||
| .height(22) |
 | ```arkts
.width(22)
.height(22)
|
考虑到上述的多种样式,可以将选项按钮抽取为一个自定义组件,并定义一个状态变量来控制按钮的样式,状态变量的类型可使用如下枚举类型
export enum OptionStatus {
  Default, //默认状态
  Right, //正确状态
  Wrong //错误状态
}
这样一来,答完一道题目后,我们只需修改上述状态变量,按钮就能呈现出对应的样式了。
第二步:实现修改按钮状态的逻辑
正常情况下,每次切换题目后,ForEach渲染的选项按钮都会重建,因此我们只需考虑选项按钮如何从默认的Default状态切到Right或者Wrong即可。
:::success
注意:
若前后两道题目的options数组中的选项有重合,按照ForEach尽量复用原有组件的原则,那么有些OptionButton组件就可能不会重建,此时我们还要去考虑如何将这些OptionButton组件的状态从上一道题目的Right或者Wrong恢复为Default。为了简化逻辑,我们可以将ForEach的keyGenerator设置为option => this.questions[this.currentIndex].word + '-' + option,这样就能确保每道题目的OptionButton都会重建。
:::
将按选项按钮从Default状态切换为Right或者Wrong,需要考虑如下两个问题
:::info
- 怎样触发每个按钮改变自身状态的操作
- 每个按钮怎样判断自身应该变为哪个状态
:::
具体逻辑如下图所示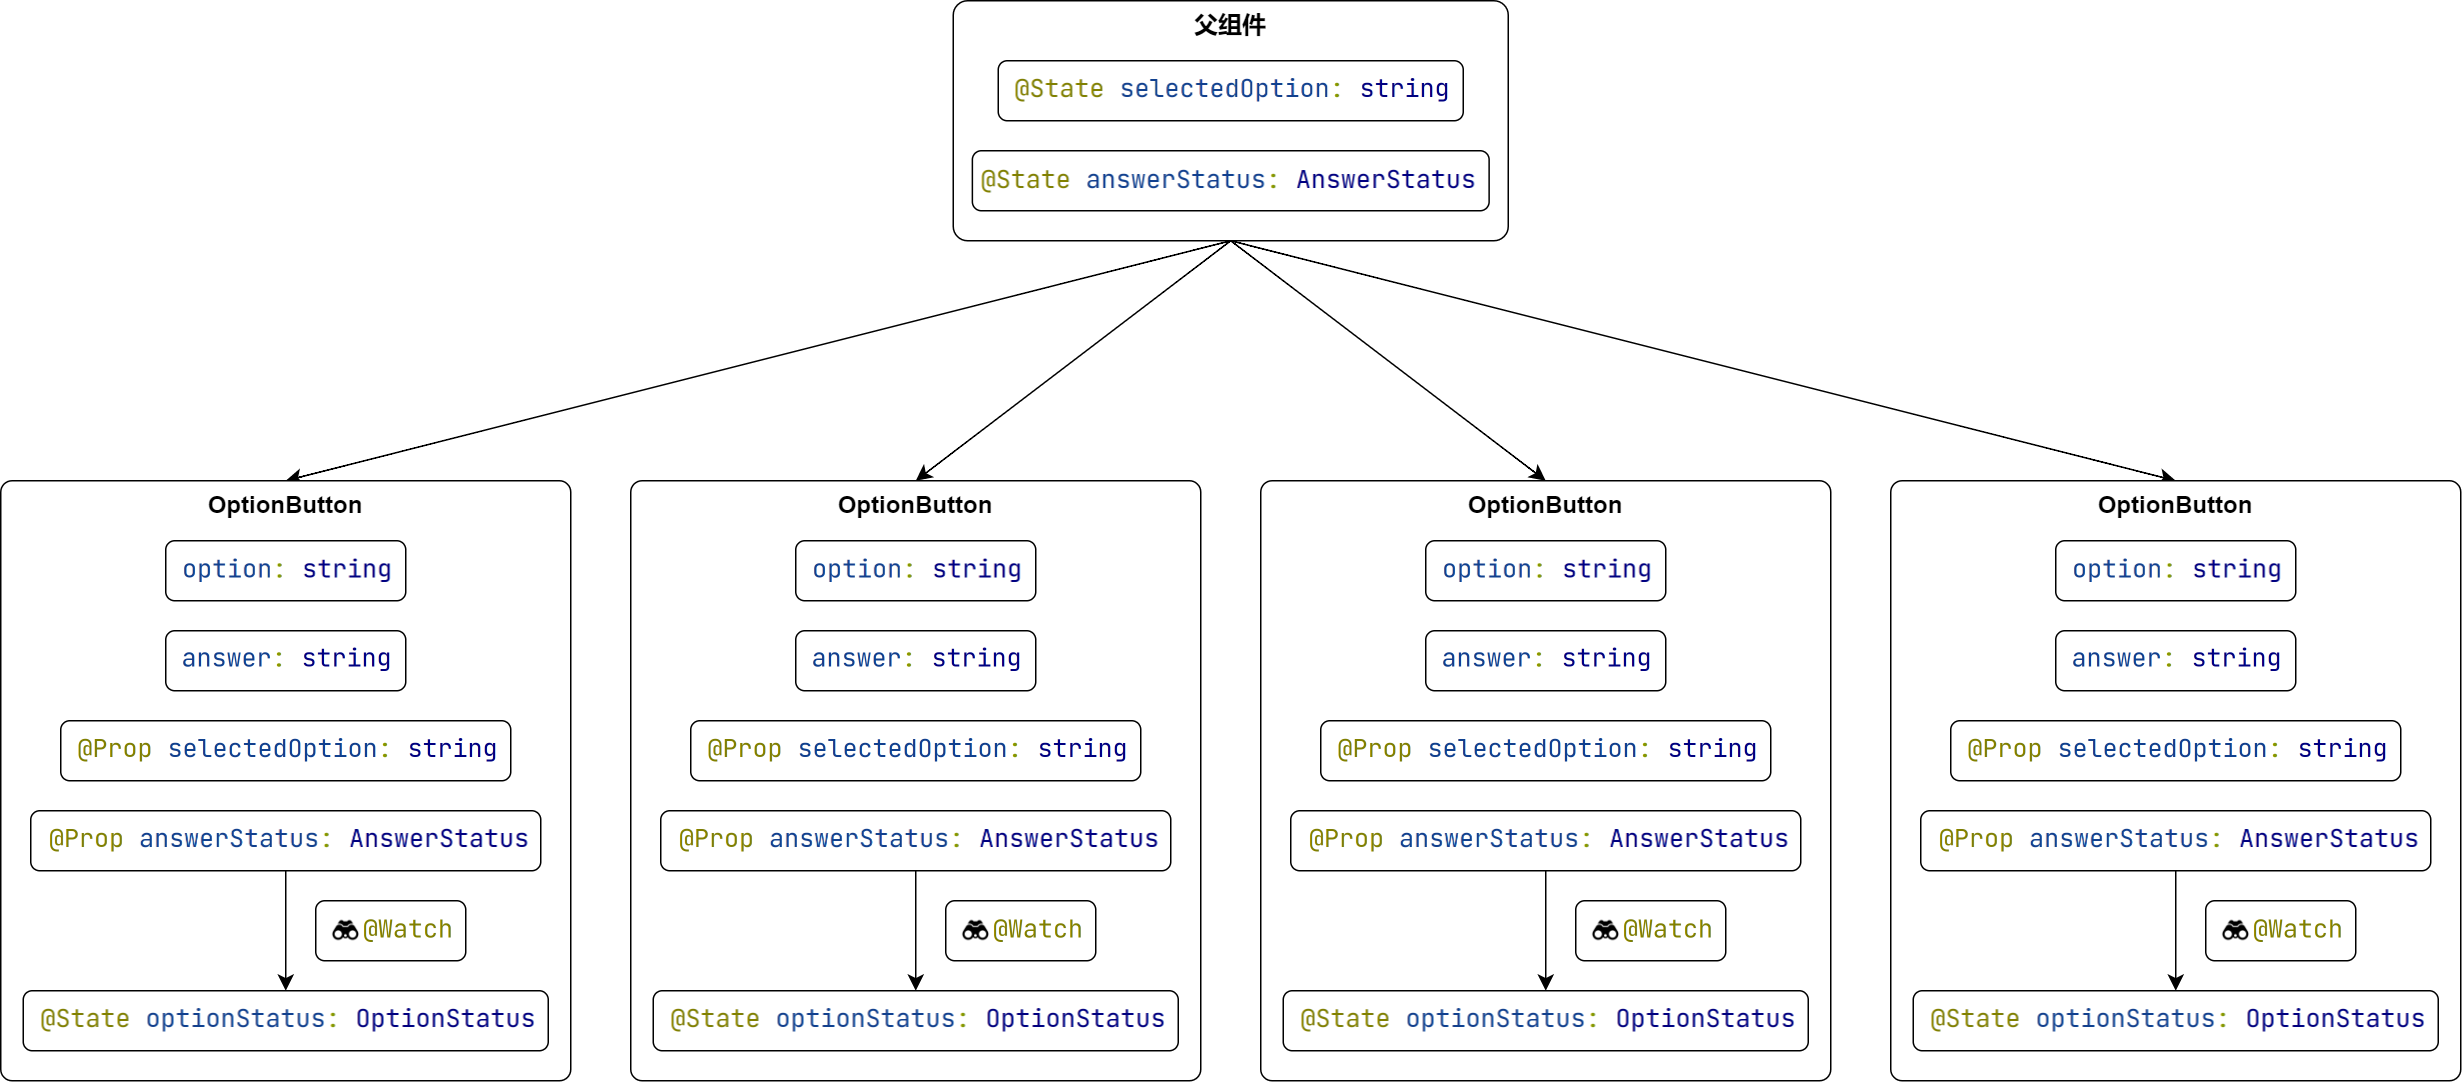
:::info
说明: - 子组件中的
option和answer分别表示选项和正确答案,因此子组件可根据这两个变量判断自身是否是正确答案。 - 父组件中的
@State selectedOption变量用于记录当前选择的选项,子组件中的@Prop selectedOption会同步父组件的变化,因此子组件可根据option和selectedOption判断自身是否是被选答案。 answerStatus变量表示当前题目的作答状态,作答状态共有两个,分别是AnswerStatus.Answering和AnswerStatus.Answered。每道题目的初始作答状态都是AnswerStatus.Answering,作答后会变为AnswerStatus.Answered。父组件根据answerStatus变量控制选项按钮是否可用,子组件通过监听answerStatus的变化来触发修改optionStatus的操作。
:::
统计信息
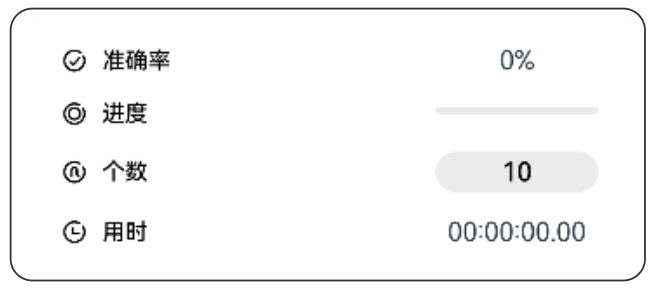
由于各项统计信息的结构相似,因此可以考虑将统计信息也抽取为一个自定义组件,组件应有三个参数,分别是图标、名称和一个UI组件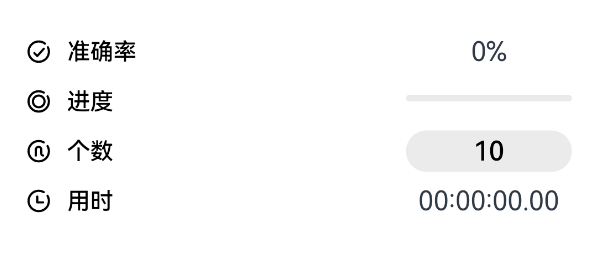
:::success
注意:UI组件参数需使用@BuilderParam装饰
:::
考虑到后序打卡圈需要用到统计信息,但字体颜色不同,因此可以再增加一个参数——字体颜色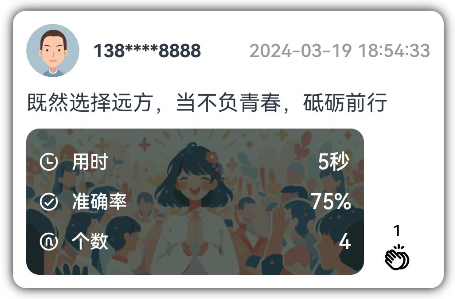
组件样式可参考下表
| 效果(以准确率为例) |  |
|---|---|
| 容器样式参考 | `arkts |
| .width('100%') | |
| .height(30) |
 |
| 图标样式参考 | ```arkts
.height(14)
.width(14)
|
| 名称样式参考 | `arkts
.fontWeight(FontWeight.Medium)
.fontSize(14)
.fontColor(this.fontColor)
 |


##### 准确率
为统计**准确率,**需要定义`answeredCount`和`rightCount`两个状态变量,`answeredCount`表示本轮测试已作答个数,`rightCount`表示正确个数,并在每次作答后,更新上述变量。

##### 进度
进度的统计需要用到`totalCount`和`answeredCount`两个状态变量,并通过进度条组件**Progress**呈现。

##### 个数
个数通过一个按钮组件**Button**呈现,点击该按钮时,需要弹出文本选择器,选择下一轮测试的单词个数,选择后需要重新拉取指定个数的题目。按钮的样式可参考下表

| 样式 | 效果 |
| --- | --- |
| ```arkts
.width(100)
.height(25)
.backgroundColor('#EBEBEB')
.fontColor(Color.Black)
|  |
|
:::success
注意:只有停止状态下才可修改题目个数
:::
用时
计时器需要用到TextTimer组件,该组件的用法如下
1.参数
TextTimer需要传入一个controller参数,用于控制计时器的启动、暂停和重置,具体用法如下
//controller声明
timerController: TextTimerController = new TextTimerController();

//组件声明
TextTimer({ controller: this.timerController })

//启动计时器
this.timerController.start()
//暂停计时器
this.timerController.pause()
//重置计时器
this.timerController.reset()
2.事件
TextTimer的常用事件为onTimer,只要计时器发生变化,就会触发该事件,因此可用该事件记录用时。该方法接收的回调函数定义如下
(utc: number, elapsedTime: number) => void其中utc表示当前的时间戳,elapsedTime表示自计时器开始以来所经过时间,单位是毫秒。
弹窗
弹窗的作用是展示统计信息,因此我们需要为弹窗定义三个参数,分别是answeredCount、rightCount、timeUsed。
弹窗的布局如下图所示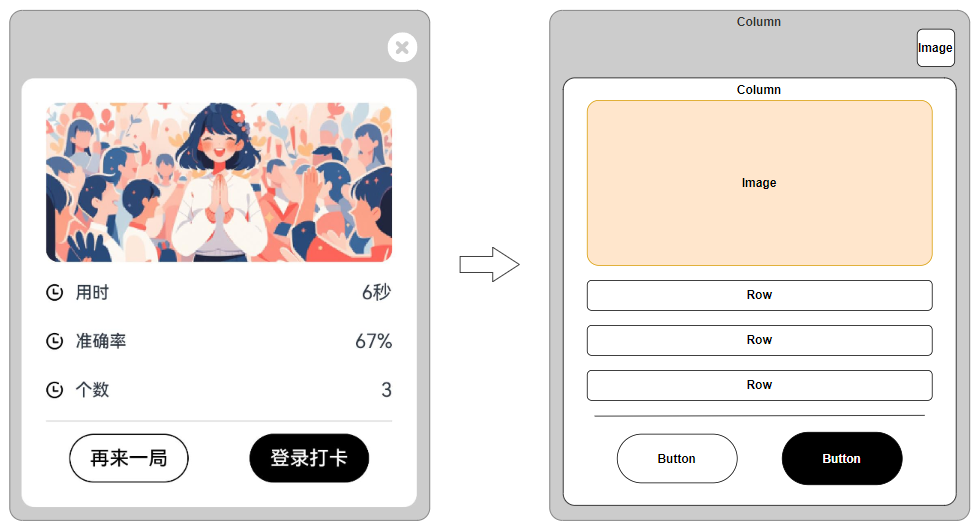
弹窗内组件的样式可参考下表
| 组件 | 样式 | 效果 |
|---|---|---|
| 外层容器 | `arkts | |
| .backgroundColor(Color.Transparent) | ||
| .width('80%') |
 |  |
| 关闭按钮 | ```arkts
.width(25)
.height(25)
.alignSelf(ItemAlign.End)
|  |
|
| 内层容器 | `arkts
.backgroundColor(Color.White)
.width('100%')
.padding(20)
.borderRadius(10)
|  |
| 图片 | ```arkts
.width('100%')
.borderRadius(10)|  |
|
:::success
注意:默认情况下所有弹窗都使用默认的样式,如需使用自定义样式,需要为CustomDialogController配置customStyle:true参数。
:::
时间格式转换逻辑可参考如下代码
export function convertMillisecondsToTime(timeUsed: number): string {
  // 计算小时、分钟和秒
  const hours = Math.floor(timeUsed / 3600000); // 1小时 = 3600000毫秒
  const minutes = Math.floor((timeUsed % 3600000) / 60000); // 1分钟 = 60000毫秒
  const seconds = Math.floor((timeUsed % 60000) / 1000); // 1秒 = 1000毫秒

  // 将结果格式化为时分秒字符串
  if (hours > 0) {
    return `${hours}时  ${minutes}分 ${seconds}秒`
  } else if (minutes > 0) {
    return `${minutes}分 ${seconds}秒`
  } else {
    return `${seconds}秒`
  }
}弹窗的交互逻辑是:
点击关闭按钮,关闭弹窗并重置题目和统计信息
点击再来一局,关闭弹窗并重置题目和统计信息,然后直接开始测试
点击登录打卡,关闭弹窗并重置题目和统计信息,然后跳转到登录页面,这部分功能后边再进行实现。
Tab布局
概述
本节要完成的内容是Tab布局,具体效果如下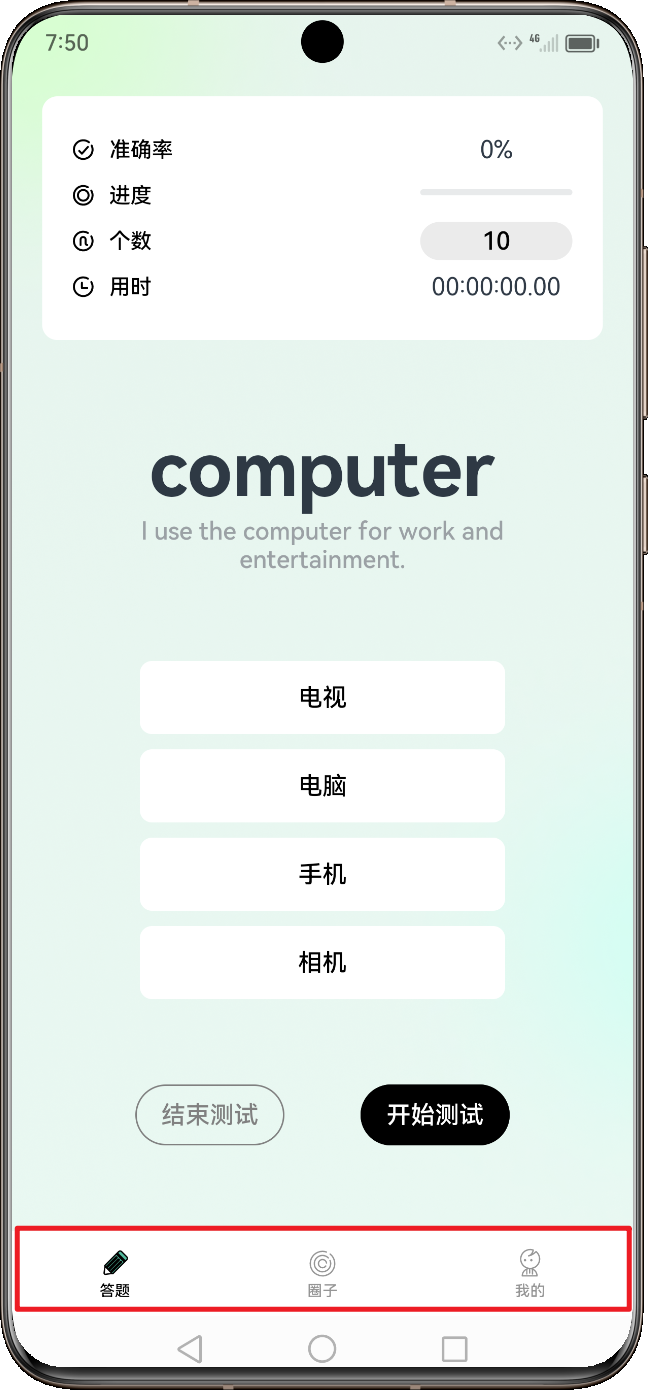
实现思路
所需技能
实现上述效果需要用到以下技能
:::success
Tabs组件
:::
上述内容可参考HarmonyOS 4.0 应用开发中的第7章。
实现过程
标签样式可参考下表
| 组件 | 选中效果 | 未选中效果 |
|---|---|---|
| 图标 |  `arkts | |
| @Styles function tabIconStyle() { | ||
| .width(25) | ||
| .height(25) | ||
| } |
| ```arkts
@Styles function tabIconStyle() {
.width(25)
.height(25)
}|
| 文字 | 
`arkts
@Extend(Text) function tabTitleStyle(color: ResourceColor) {
.fontSize(10)
.fontWeight(FontWeight.Medium)
.fontColor(color) //Color.Black
.margin({ bottom: 2 })
}
| ```arkts
@Extend(Text) function tabTitleStyle(color: ResourceColor) {
.fontSize(10)
.fontWeight(FontWeight.Medium)
.fontColor(color) //#959595
.margin({ bottom: 2 })
}|
欢迎页面
概述
欢迎页面的功能相对简单,要实现的具体效果如下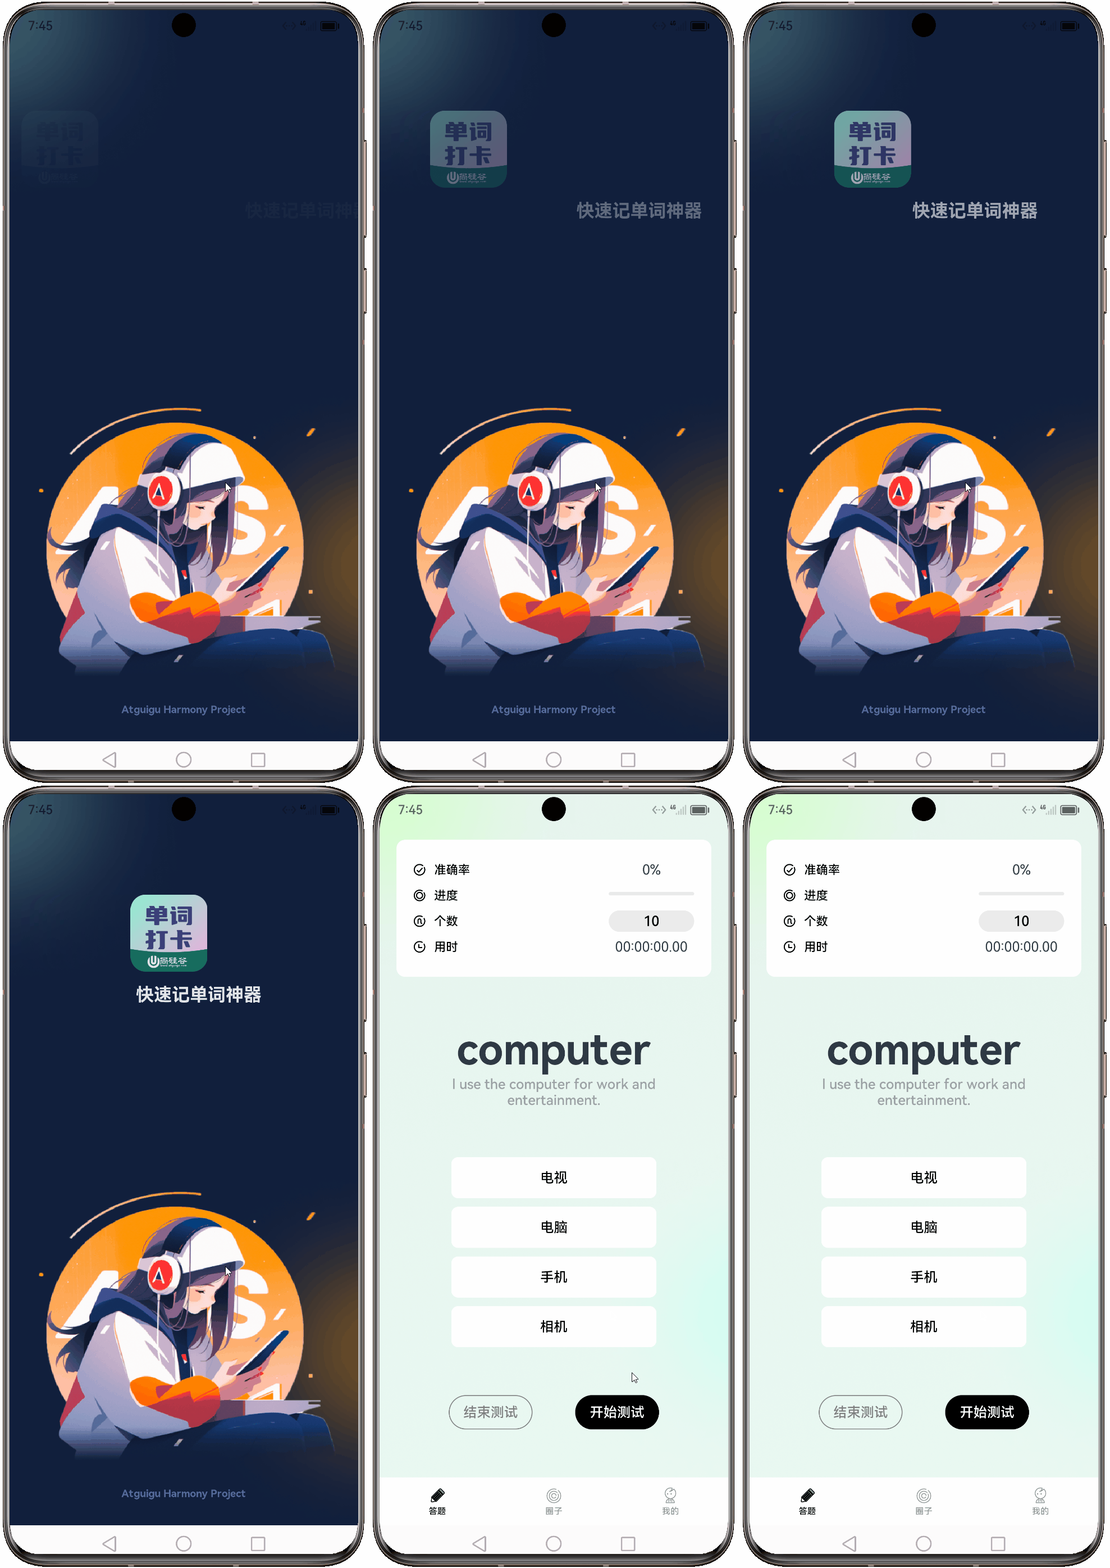
实现思路
所需技能
答题模块所需技能如下
:::success
- 组件动画效果
- 页面路由
- 组件生命周期钩子函数
:::
上述内容可参考HarmonyOS 4.0 应用开发中的第8、9、10章。
实现过程
基本布局和样式
欢迎页面的基本布局如下图所示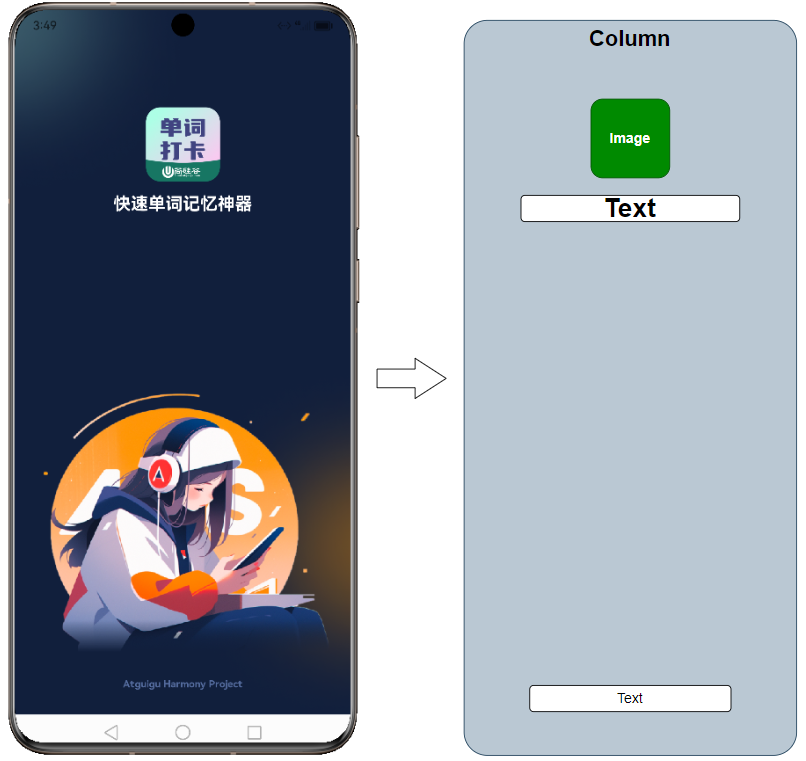
各组件样式可参考下表
| 组件 | 样式 | 效果 |
|---|---|---|
| 页面背景 | `arkts | |
| @Styles function bgStyle() { | ||
| .width('100%') | ||
| .height('100%') | ||
| .backgroundImage($r('app.media.img_splash_bg')) | ||
| .backgroundImageSize({ width: '100%', height: '100%' }) | ||
| } |
|  |
| logo | ```arkts
@Extend(Image) function logoStyle() {
.width(90)
.height(90)
.margin({ top: 120 })
}|  |
|
| 标题 | `arkts
@Extend(Text) function titleStyle() {
.fontSize(21)
.fontColor(Color.White)
.fontWeight(FontWeight.Bold)
.margin({ top: 15 })
}
|  |
| 页脚 | ```arkts
@Extend(Text) function footerStyle() {
.fontSize(12)
.fontColor('#546B9D')
.fontWeight(FontWeight.Bold)
.margin({ bottom: 30 })
}|  |
|
实现动画效果
要实现的动画效果如下图所示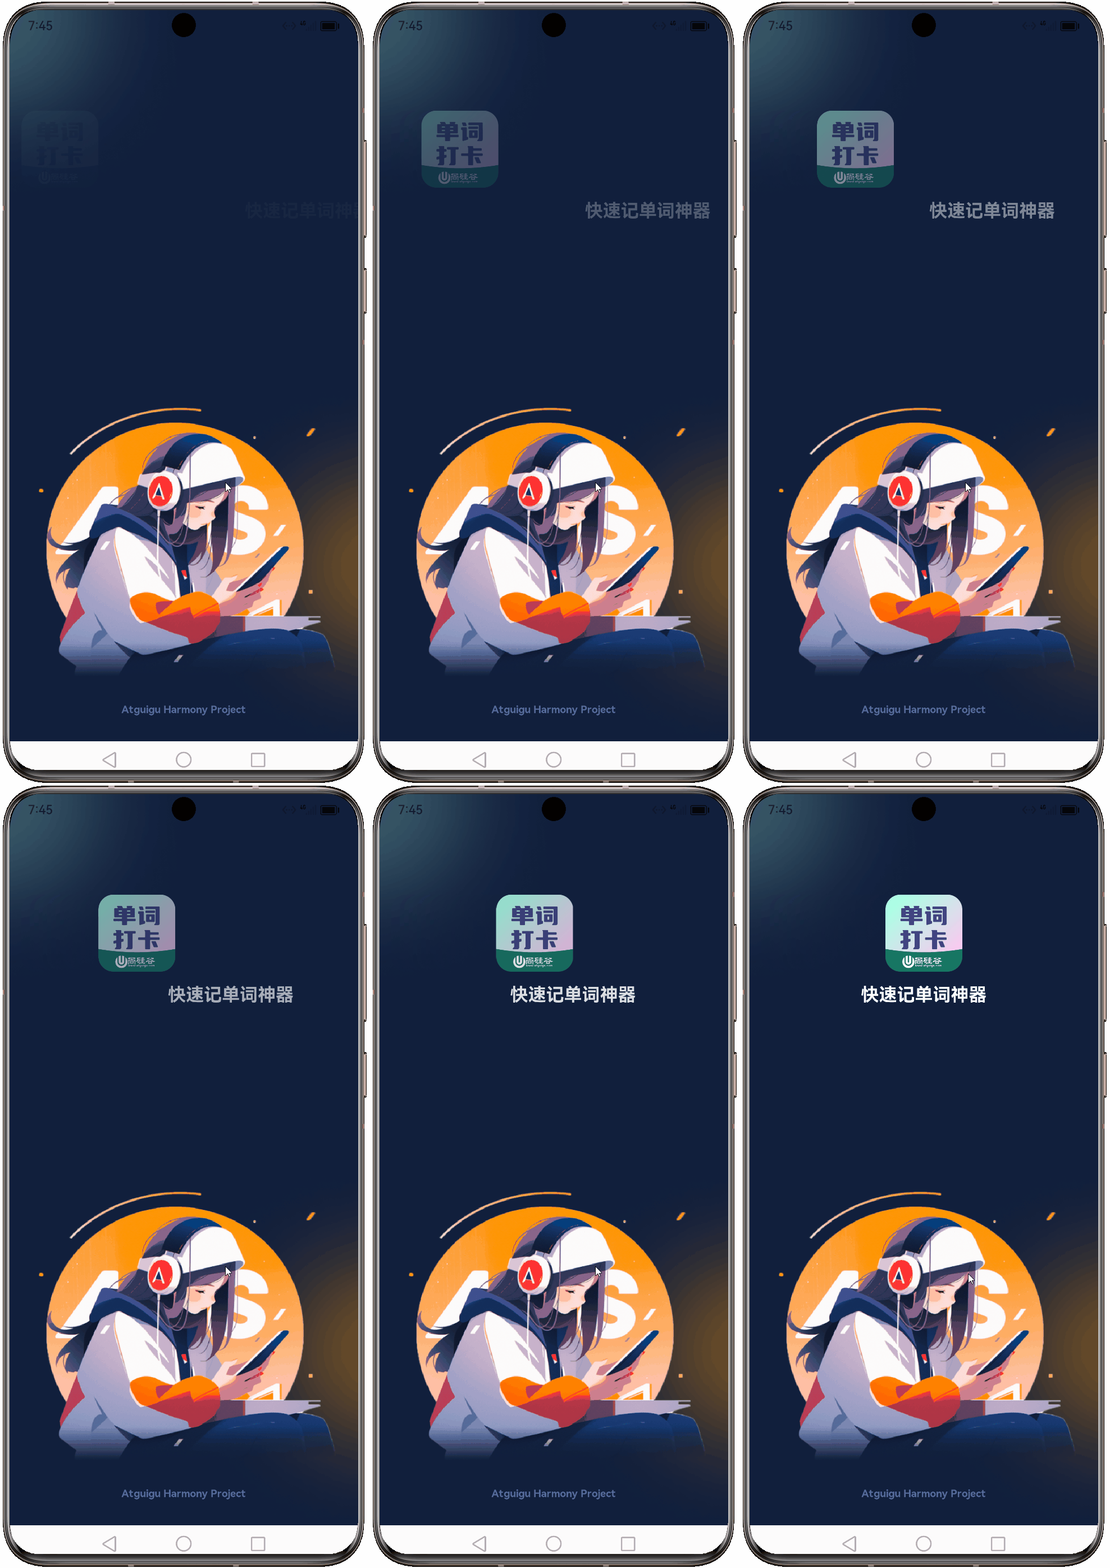
很明显,上述动画效果可归类为组件转场动画,因此可使用transition()方法配置动画效果,需要注意的是,上述动画叠加了两个转场效果,分别是平移和透明度。
触发动画效果
要求页面出现时自动触发动画效果,此时需要用到组件生命周期函数,这里可使用onPageShow()函数。
页面跳转
要求动画播放完毕后,停留200ms后跳转到答题页面,此时需要用到页面路由功能,需要注意的是,一般情况下欢迎页是不可返回的。
指定应用初始页面
修改entry/src/main/ets/entryability/EntryAbility.ts文件中的如下内容,指定应用初始页面位欢迎页
onWindowStageCreate(windowStage: window.WindowStage) {
  // Main window is created, set main page for this ability
  hilog.info(0x0000, 'testTag', '%{public}s', 'Ability onWindowStageCreate');

  //修改位置
  windowStage.loadContent('pages/SplashPage', (err, data) => {
    if (err.code) {
      hilog.error(0x0000, 'testTag', 'Failed to load the content. Cause: %{public}s', JSON.stringify(err) ?? '');
      return;
    }
    hilog.info(0x0000, 'testTag', 'Succeeded in loading the content. Data: %{public}s', JSON.stringify(data) ?? '');
  });
}
:::success
说明:该文件的具体含义可参考HarmonyOS 4.0 应用开发第15章
:::
登录功能
概述
登录方式为手机短信验证码登录,具体效果如下图所示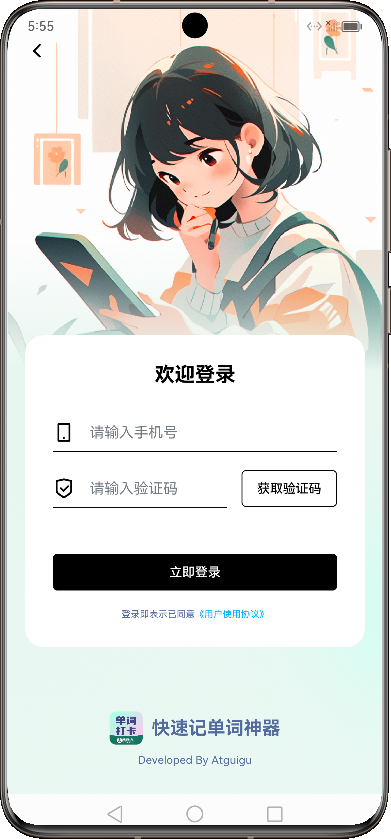
实现思路
所需技能
登录功能所需技能如下
:::success
- 网络请求
- 应用级状态管理
:::
上述内容可参考HarmonyOS 4.0 应用开发中的第12、13章。
实现过程
基本布局和样式
登录页面的基本布局和样式可参考如下代码
import router from '@ohos.router'
@Entry
@Component
struct LoginPage {
  @State phone:string=''
  @State code:string=''
  build() {
    Column() {
      Image($r('app.media.ic_back'))
        .backStyle()
        .alignSelf(ItemAlign.Start)
        .onClick(() => {
          //todo:返回上一页面
        })

      Blank()
      Column() {
        Text('欢迎登录')
          .titleStyle()

        Row() {
          Image($r("app.media.ic_phone"))
            .iconStyle()
          TextInput({ placeholder: '请输入手机号码',text:this.phone })
            .inputStyle()
            .onChange((value)=>{
              this.phone=value;
            })
        }.margin({ top: 30 })

        Divider()
          .color(Color.Black)

        Row() {
          Image($r("app.media.ic_code"))
            .iconStyle()
          TextInput({ placeholder: '请输入验证码',text:this.code })
            .inputStyle()
            .onChange((value)=>{
              this.code=value;
            })
          Button('获取验证码')
            .buttonStyle(Color.White, Color.Black)
            .onClick(() => {
              //todo:获取验证码
            })

        }.margin({ top: 20 })

        Divider()
          .margin({ right: 120 })
          .color(Color.Black)

        Button('立即登录')
          .buttonStyle(Color.Black, Color.White)
          .width('100%')
          .margin({ top: 50 })
          .onClick(() => {
            //todo:登录
          })

        Row() {
          Text('登录即表示已同意')
            .fontSize(10)
            .fontColor('#546B9D')
          Text('《用户使用协议》')
            .fontSize(10)
            .fontColor('#00B3FF')
        }.margin({ top: 20 })
      }.formBgStyle()

      Row({ space: 10 }) {
        Image($r('app.media.ic_logo'))
          .width(36)
          .height(36)
        Text('快速记单词神器')
          .fontColor('#546B9D')
          .fontWeight(FontWeight.Bold)
          .fontSize(20)
      }.margin({ top: 70 })

      Text('Developed By Atguigu')
        .fontSize(12)
        .fontColor('#546B9D')
        .margin(10)

    }
    .loginBgStyle()
  }
}

@Styles function loginBgStyle() {
  .width('100%')
  .height('100%')
  .backgroundImage($r("app.media.img_login_bg"))
  .backgroundImageSize({ width: '100%', height: '100%' })
  .padding({
    top: 30, bottom: 30, left: 20, right: 20
  })
}

@Styles function backStyle() {
  .width(25)
  .height(25)
}

@Styles function formBgStyle() {
  .backgroundColor(Color.White)
  .padding(30)
  .borderRadius(20)
}

@Extend(Text) function titleStyle() {
  .fontWeight(FontWeight.Bold)
  .fontSize(22)
}

@Styles function iconStyle() {
  .width(24)
  .height(24)
}

@Extend(TextInput) function inputStyle() {
  .height(40)
  .layoutWeight(1)
  .fontSize(14)
  .backgroundColor(Color.Transparent)
}

@Extend(Button) function buttonStyle(bgColor: ResourceColor, fontColor: ResourceColor) {
  .type(ButtonType.Normal)
  .fontSize(14)
  .fontWeight(FontWeight.Medium)
  .borderWidth(1)
  .borderRadius(5)
  .backgroundColor(bgColor)
  .fontColor(fontColor)
}
对接后台接口
第一步:添加axios依赖
在终端执行如下命令
ohpm install @ohos/axios第二步:创建axios实例
import axios, { AxiosError, AxiosResponse, InternalAxiosRequestConfig } from '@ohos/axios'
import promptAction from '@ohos.promptAction';

//创建axios实例
export const instance = axios.create({
  baseURL: 'http://xxx.xxx.xxx.xxx:3000',
  timeout: 2000
})

// 添加请求拦截器
instance.interceptors.request.use((config: InternalAxiosRequestConfig) => {
  // 通过AppStorage获取token
  const token = AppStorage.Get('token')
  if (token) {
    // 若token存在,则将其添加到请求头
    config.headers['token'] = token
  }
  return config;
}, (error: AxiosError) => {
  //若出现异常,则提示异常信息
  promptAction.showToast({ message: error.message })
  return Promise.reject(error);
});

// 添加响应拦截器
instance.interceptors.response.use((response: AxiosResponse) => {
  // 若服务器返回的是正常数据,不做任何处理
  if (response.data.code === 200) {
    return response
  } else {
    //若服务器返回的是异常数据,则提示异常信息
    promptAction.showToast({ message: response.data.message })
    return Promise.reject(response.data.message)
  }
}, (error: AxiosError) => {
  //若出现异常,则提示异常信息
  promptAction.showToast({ message: error.message })
  return Promise.reject(error);
});
第三步:对接后台接口
登录功能需要对接两个后台接口,分别是获取验证码和登录
//获取验证码
export function sendCode(phone: string) {
  return instance.get('/word/user/code', { params: { phone: phone } });
}

//登录
export function login(phone: string, code: string) {
  return instance.post('/word/user/login', { phone: phone, code: code });
}
:::success
注意:需要配置网络访问权限
:::
实现登录逻辑
登录逻辑相对简单,需要注意的是登录成功后,应将token保存至PersistentStorage中,并返回上一页面。
打卡功能
概述
完成登录功能后,便可实现答题结束后的打卡功能。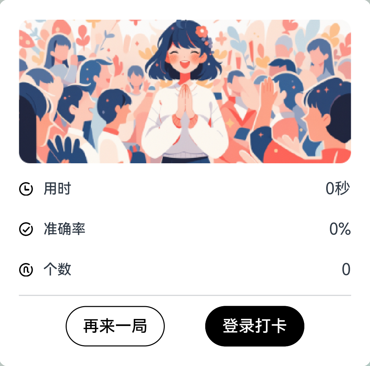
结果弹窗中,应该根据当前的登录状态显示不同的打卡按钮,若为登录状态应显示立即打卡,否则显示登录打卡。
点击立即打卡,应直接发送打卡请求并跳转到打卡圈,具体流程如下图所示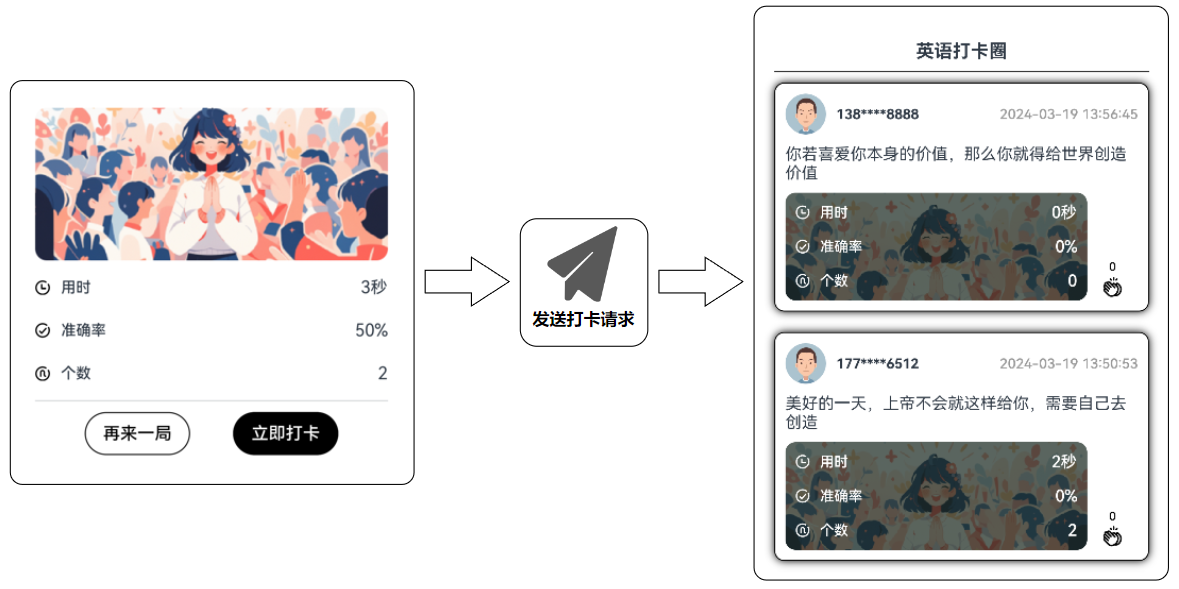
点击登录打卡,应先跳转到登录页面,登录成功后,再发送打卡请求,并跳转到打卡圈,具体流程如下图所示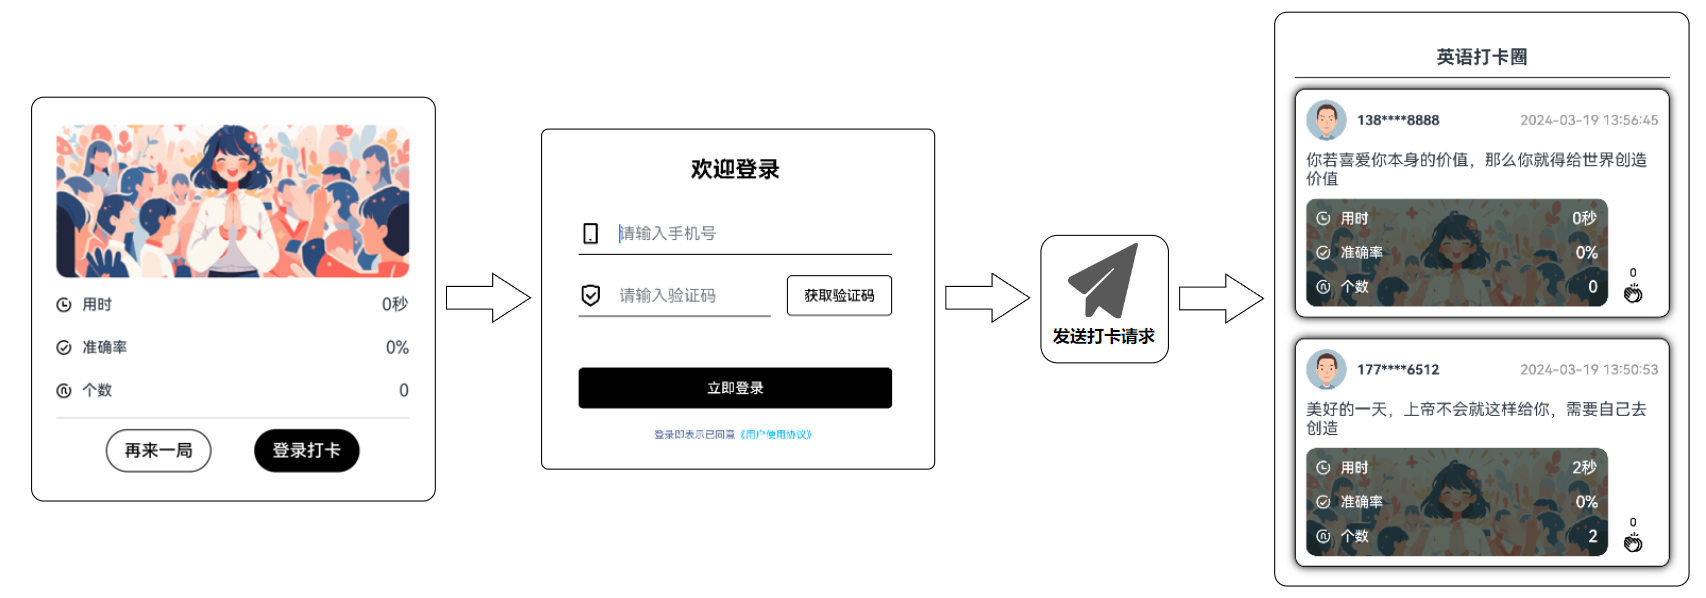
实现思路
页面跳转逻辑
首先按照上述要求实现页面的跳转逻辑。
对接后台接口
export function createPost(post: {
  rightCount: number,
  answeredCount: number,
  timeUsed: number
}) {
  return instance.post('/word/post/create', post)
}
打卡圈页面
概述
打卡圈用于展示全部用户的打卡记录,并提供点赞功能。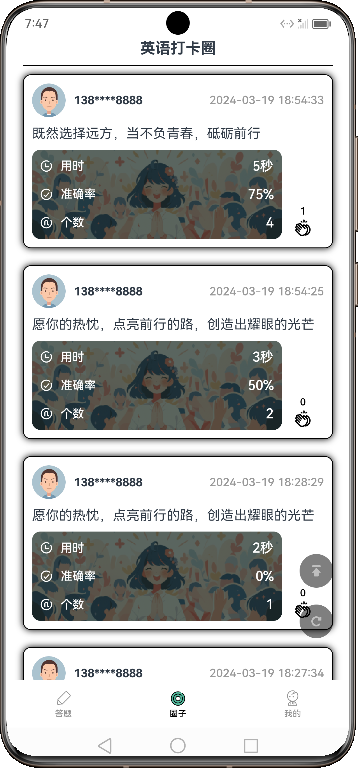
实现思路
定义打卡列表状态变量
服务端返回的打卡信息结构如下:
{
  "id": 0,
  "postText": "string", //打卡文案
  "rightCount": 0, //正确个数
  "answeredCount": 0, //答题个数
  "timeUsed": 0, //用时
  "createTime": "string", //打卡时间
  "likeCount": 0, //点赞个数
  "nickname": "string", //用户昵称
  "avatarUrl": "string", //用户头像
  "isLike": true //当前登录用户是否已点赞
}isLike属性表示当前用户是否已点赞,我们需要根据该属性显示不同颜色的点赞图标,如下
**isLike=true** | **isLike=false** |
|---|---|
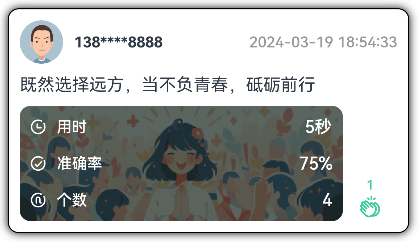 | 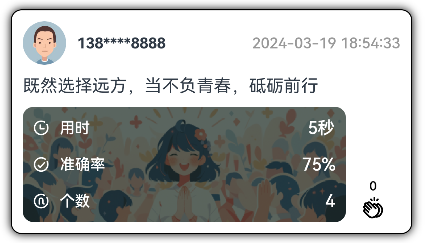 |
当用户执行点赞或者取消点赞的操作时,只需修改isLike的值,就能实现图标颜色的切换。需要注意的是,我们会使用一个数组保存打卡记录列表,而isLike是数组元素的属性。前文提到过直接修改数组元素的属性,框架是观察不到的,因此我们需要将打卡记录作为一个子组件,然后将打卡记录作为该组件的一个属性,并且该属性需要使用@ObjectLink装饰,另外打卡记录的类型需要是一个class,并且该class需要使用@Observed装饰,该class的定义如下
@Observed
export class PostInfo {
  id: number;
  postText: string;
  rightCount: number;
  answeredCount: number;
  timeUsed: number;
  createTime: string;
  likeCount: number;
  nickname: string;
  avatarUrl: string
  isLike: boolean;

  constructor(post:{id: number, postText: string, rightCount: number, answeredCount: number, timeUsed: number, createTime: string, likeCount: number, nickname: string, avatarUrl: string, isLike: boolean}) {
    this.id = post.id;
    this.postText = post.postText;
    this.rightCount = post.rightCount;
    this.answeredCount = post.answeredCount;
    this.timeUsed = post.timeUsed;
    this.createTime = post.createTime;
    this.likeCount = post.likeCount;
    this.nickname = post.nickname;
    this.avatarUrl = post.avatarUrl;
    this.isLike = post.isLike;
  }
}
打卡信息数组的定义如下:
@State postInfoList: PostInfo[] = []基本布局和样式
为方便后序布局和样式的开发,可先在postInfoList数组添加一个测试元素,如下
@State postInfoList: PostInfo[] = [new PostInfo({
  id: 1,
  postText: "既然选择远方,当不负青春,砥砺前行",
  rightCount: 3,
  answeredCount: 4,
  timeUsed: 5747,
  createTime: "2024-03-19 18:54:33",
  likeCount: 1,
  nickname: "138****8888",
  avatarUrl: "https://oss.aliyuncs.com/aliyun_id_photo_bucket/default_handsome.jpg",
  isLike: false
})]
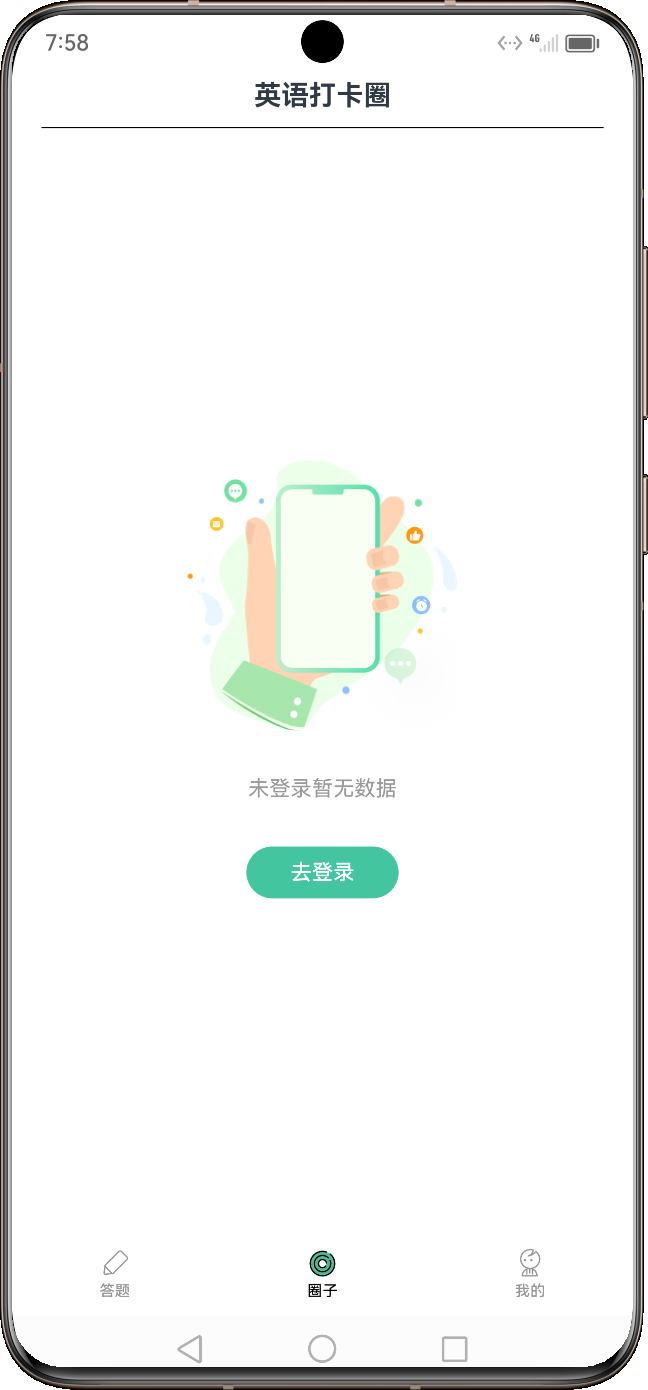
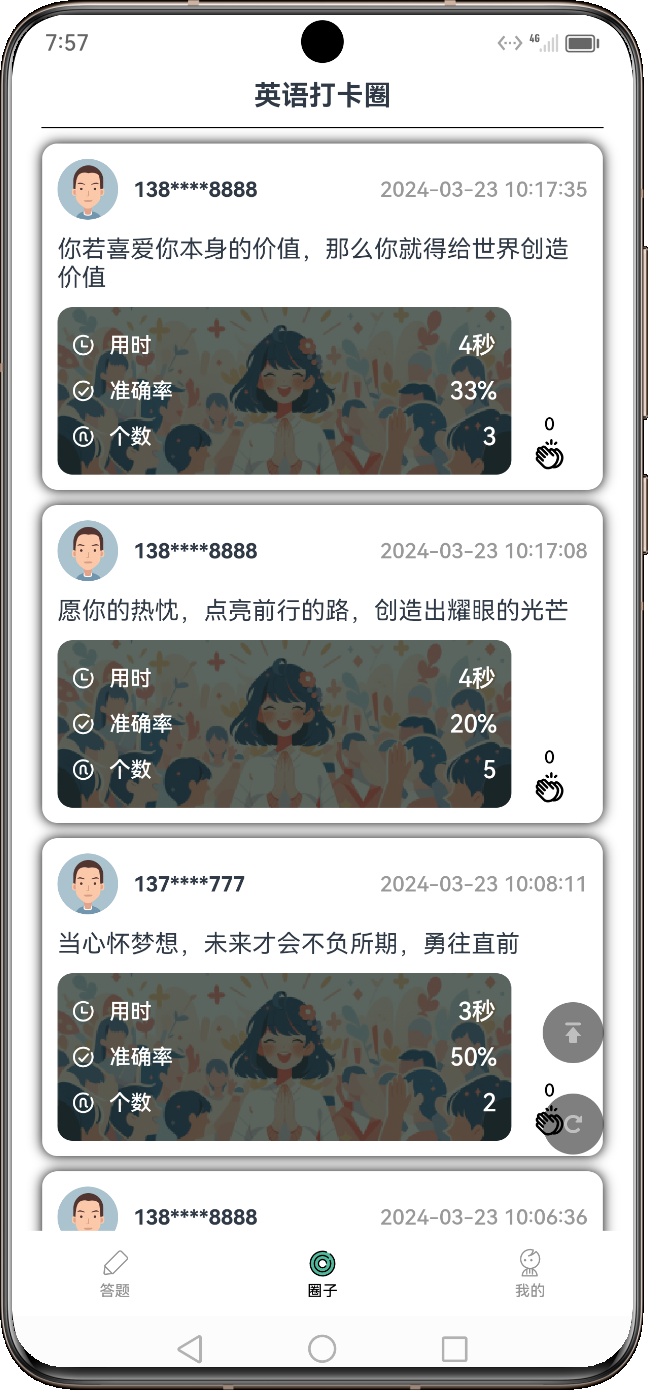
打卡圈要求用户登录后才可访问,因此需要根据登录状态显示不同的内容,如下
| 未登录 | 已登录 |
|---|---|
 |  |
登录状态可根据token进行判断
@StorageProp('token') token: string = ''该页面的主体框架可参考如下代码
| 代码 | 效果 |
|---|---|
`arkts | |
| build() { | |
| Column() { |
Text('英语打卡圈')
  .fontSize(18)
  .margin({ top: 45 })
  .fontWeight(FontWeight.Bold)
Divider()
  .color(Color.Black)
  .margin({ left: 20, right: 20, top: 10 })

if (this.token) {
  //todo:打卡列表
} else {
  //todo:未登录
}
}.height('100%')
.width('100%')
}
|  |
**未登录**状态下的内容可参考如下代码
| 代码 | 效果 |
| --- | --- |
| ```arkts
@Builder
unLoginBuilder() {
Column({ space: 30 }) {
Image($r("app.media.ic_unLogin_bg"))
.width(177)
.height(177)
Text('未登录暂无数据')
.fontSize(14)
.fontColor('#999999')
Button('去登录')
.fontColor(Color.White)
.fontSize(14)
.width(100)
.height(34)
.backgroundColor('#43C6A0')
.onClick(() => router.pushUrl({ url: 'pages/LoginPage' }))
}
.width('100%')
.layoutWeight(1)
.justifyContent(FlexAlign.Center)
}|  |
|
登录状态下的内容可参考如下代码
| 代码 | 效果 |
|---|---|
`arkts | |
| @Builder | |
| listBuilder() { | |
| Stack() { |
List() {
  ForEach(this.postInfoList, (post) => {
    ListItem() {
      PostItem({ post: post })
    }
  })
}.width('100%')
.height('100%')
.alignListItem(ListItemAlign.Center)

Column({ space: 20 }) {
  Button({ type: ButtonType.Circle }) {
    Image($r('app.media.ic_top'))
      .height(14)
      .width(14)
  }
  .height(40)
  .width(40)
  .backgroundColor(Color.Black)
  .opacity(0.5)
  .onClick(() => {
    //todo:返回顶部
  })

  Button({ type: ButtonType.Circle }) {
    Image($r('app.media.ic_refresh'))
      .height(14)
      .width(14)
  }
  .height(40)
  .width(40)
  .backgroundColor(Color.Black)
  .opacity(0.5)
  .onClick(() => {
    //todo:刷新
  })
}
.offset({ x: -20, y: -50 })
}.width('100%')
.layoutWeight(1)
.alignContent(Alignment.BottomEnd)
}
|  |
| ```arkts
@Component
struct PostItem {
@ObjectLink post: PostInfo;
build() {
Column({ space: 10 }) {
Row({ space: 10 }) {
Image(this.post.avatarUrl)
.height(40)
.width(40)
.borderRadius(20)
Text(this.post.nickname)
.height(40)
.fontSize(14)
.fontWeight(FontWeight.Bold)
Blank()
Text(this.post.createTime)
.height(40)
.fontSize(14)
.fontColor('#999999')
.fontWeight(FontWeight.Medium)
}.width('100%')
Text(this.post.postText)
.width('100%')
Row() {
Column() {
StatItem({
icon: $r('app.media.ic_timer_white'),
name: '用时',
fontColor: Color.White }) {
Text(convertMillisecondsToTime(this.post.timeUsed))
.statTextStyle()
}
StatItem({
icon: $r('app.media.ic_accuracy_white'),
name: '准确率',
fontColor: Color.White
}) {
Text((this.post.answeredCount === 0 ? 0 : this.post.rightCount / this.post.answeredCount * 100).toFixed(0) + '%')
.statTextStyle()
}
StatItem({
icon: $r('app.media.ic_count_white'),
name: '个数',
fontColor: Color.White
}) {
Text(this.post.answeredCount.toString())
.statTextStyle()
}
}
.padding(10)
.borderRadius(10)
.layoutWeight(1)
.backgroundImage($r('app.media.img_post_bg'))
.backgroundImageSize(ImageSize.Cover)
Column() {
Text(this.post.likeCount.toString())
.fontSize(12)
.fontWeight(FontWeight.Medium)
.fontColor(this.post.isLike ? '#3ECBA1' : '#000000')
Image(this.post.isLike ? $r('app.media.ic_post_like_selected') : $r('app.media.ic_post_like'))
.width(26)
.height(26)
.onClick(() => {
//todo:点赞/取消点赞
})
}.width(50)
}.width('100%')
.alignItems(VerticalAlign.Bottom)
}
.padding(10)
.width('90%')
.margin({ top: 10 })
.borderRadius(10)
.shadow({ radius: 20 })
}
}
@Extend(Text) function statTextStyle() {
.width(100)
.fontSize(16)
.textAlign(TextAlign.End)
.fontWeight(FontWeight.Medium)
.fontColor(Color.White)
}|  |
|
对接后台接口
打卡圈共需对接三个接口,分别是获取打卡信息列表、点赞、取消点赞,具体内容如下
//获取全部打卡列表
export function getAllPost(page: number, size: number) {
  return instance.get('/word/post/getAll', { params: { page: page, size: size } })
}

//点赞
export function like(postId: number) {
  return instance.get('/word/like/create', { params: { postId: postId } })
}

//取消点赞
export function cancelLike(postId: number) {
  return instance.get('/word/like/cancel', { params: { postId: postId } })
}
完成加载数据逻辑
打卡列表的数据加载方式为懒加载,起初只会加载一页数据,之后每次滑动到列表底部再加载下一页,全部加载完毕后,需要给出提示,如下图所示: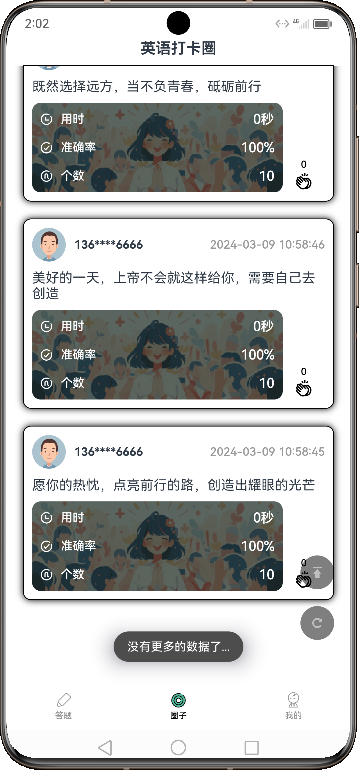
第一页数据的加载时机,和启动应用时,用户的登录状态相关。如果启动应用时,已经是登录状态,那么在CirclePage组件出现之前就需要加载第一页数据;如果启动应用时不是登录状态,那就要等到用户登录之后再加载第一页数据。
触底加载逻辑需要需要借助List组件的onReachEnd()事件,另外需要定义两个变量,一是page,表示下次要加载的页数,一是total,表示总记录数,用于判断是否加载完毕。
完成打卡后自动刷新逻辑
打卡完成后会自动跳转到打卡圈,此时需要自动刷新页面以显示最新打卡内容,具体效果如下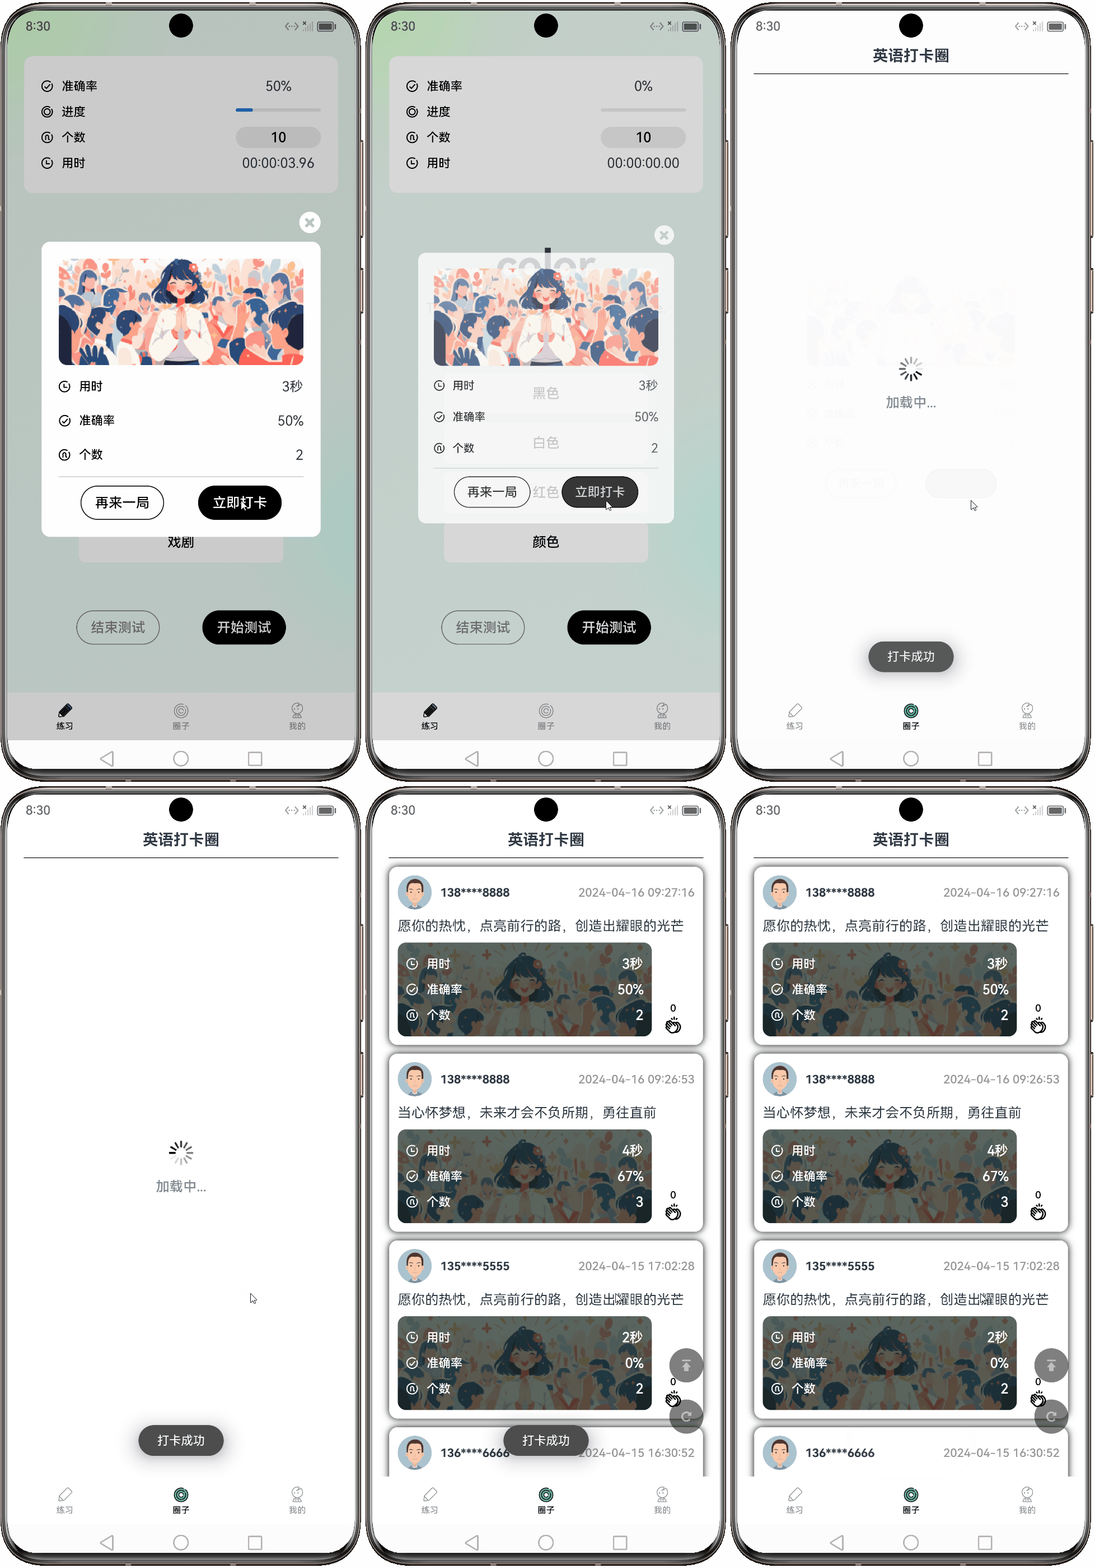
为实现该功能,需要令打卡圈页面感知到打卡事件,进而触发刷新逻辑。事件通知可通过emitter实现,其具体用法如下
导入emitter模块
import emitter from '@ohos.events.emitter';发送自定义事件
let event = {
    eventId: 1, //事件ID,根据业务逻辑自定义
    priority: emitter.EventPriority.LOW //事件优先级
};

let eventData = {
    data: {
        "content": "c",
        "id": 1,
        "isEmpty": false,
    }
};

// 发送eventId为1的事件,事件数据为eventData
emitter.emit(event, eventData);
订阅自定义事件
// 定义一个eventId为1的事件
let event = {
    eventId: 1
};

// 收到eventId为1的事件后执行该回调
let callback = (eventData) => {
    console.info('event callback');
};

// 订阅eventId为1的事件
emitter.on(event, callback);
刷新视图可参考如下代码
| 代码 | 效果 |
|---|---|
`arkts | |
| @Builder | |
| loadingBuilder() { | |
| Column({ space: 15 }) { |
Image($r('app.media.ic_loading'))
  .width(30)
  .height(30)
Text('加载中...')
  .fontSize(16)
  .fontWeight(FontWeight.Medium)
  .fontColor('#7e8892')
}.width('100%')
.layoutWeight(1)
.justifyContent(FlexAlign.Center)
}
|  |
### 完成点赞/取消点赞逻辑
点赞和取消点赞的逻辑相对简单,当操作发生时,需要修改`isLike`和`likeCount`两个属性,并同时向后台发送点赞后者取消点赞的请求。
### 完成回到顶部逻辑
回到顶部的逻辑也相对简单,只需为List组件绑定Scroller,然后调用其`scrollToIndex`方法即可。
### 完成手动刷新逻辑
手动刷新可以复用前文自动刷新的逻辑。
# 个人中心页面
## 概述
个人中心的功能有登录/取消登录以及查看个人打卡记录,下图是未登录和登录状态
| 未登录 | 登录 |
| --- | --- |
|  |  |
下图是个人打卡记录页面,需要注意,个人打卡记录需在登录状态下才能访问

## 实现思路
### 对接后台接口
个人中心需要的接口共有两个,如下//获取登录用户信息
export function info() {
return instance.get('/word/user/info')
}
//获取我的登录打卡记录
export function getMyPost(page: number, size: number) {
return instance.get('/word/post/getMine', { params: { page: page, size: size } })
}
### 完整代码

**个人中心**
import router from '@ohos.router';
import promptAction from '@ohos.promptAction';
import { info } from '../http/Api';
@Component
export struct MinePage {
@StorageLink('token') @Watch('onTokenChange') token: string = ''
@State userInfo: {
nickname?: string,
avatarUrl?: string
} = {};
async onTokenChange() {
if (this.token) {
  let response = await info()
  this.userInfo = response.data.data;
} else {
  this.userInfo = {}
}
}
async aboutToAppear() {
if (this.token) {
  let response = await info()
  this.userInfo = response.data.data;
}
}
build() {
Stack() {
  Column() {
    Image(this.token ? this.userInfo.avatarUrl : $r('app.media.img_avatar'))
      .width(100)
      .height(100)
      .borderRadius(50)
      .margin({ top: 120 })
      .onClick(() => {
        router.pushUrl({ url: 'pages/LoginPage' })
      })

    Text(this.token ? this.userInfo.nickname : '暂未登录')
      .fontSize(18)
      .fontWeight(FontWeight.Bold)
      .fontColor(Color.Black)
      .margin({ top: 20 })

    if (!this.token) {
      Text('请点击头像登录')
        .fontSize(12)
        .fontWeight(FontWeight.Medium)
        .fontColor(Color.Black)
        .margin({ top: 4 })
    }
  }
  .width('100%')
  .height('50%')
  .backgroundImage(this.token ? this.userInfo.avatarUrl : $r('app.media.img_avatar'))
  .backgroundImageSize({ height: '100%', width: '100%' })
  .backgroundBlurStyle(BlurStyle.Regular)

  Column({ space: 10 }) {
    this.mineItemBuilder($r('app.media.ic_mine_card'), '打卡记录', () => {
      if (this.token) {
        router.pushUrl({ url: 'pages/PostHistoryPage' })
      } else {
        promptAction.showToast({ message: '请先点击头像登录' })
      }
    })
    Divider()
    this.mineItemBuilder($r('app.media.ic_mine_update'), '检查更新', () => {
      promptAction.showToast({ message: '已是最新' })
    })
    Divider()
    this.mineItemBuilder($r('app.media.ic_mine_about'), '关于', () => {
      promptAction.showToast({ message: '没有关于' })
    })

    Blank()

    if (this.token) {
      Button('退出登录')
        .width('100%')
        .fontSize(18)
        .backgroundColor(Color.Gray)
        .fontColor(Color.White)
        .onClick(() => {
          this.token = ''
        })
    }

  }
  .width('100%')
  .height('60%')
  .offset({ y: '40%' })
  .borderRadius({ topLeft: 50, topRight: 50 })
  .backgroundColor(Color.White)
  .padding(30)

}.width('100%')
.height('100%')
.alignContent(Alignment.Top)
}
@Builder
mineItemBuilder(icon: Resource, title: string, callback?: () => void) {
Row({ space: 10 }) {
  Image(icon)
    .width(24)
    .height(24)
  Text(title)
    .fontSize(16)
    .height(24)
    .fontWeight(FontWeight.Medium)
  Blank()
  Image($r('app.media.ic_arrow_right'))
    .width(24)
    .height(24)
}.width('100%')
.height(40)
.onClick(() => {
  callback();
})
}
}
**打卡记录**
import { getMyPost } from '../http/Api';
import { PostInfo } from '../model/PostInfo';
import router from '@ohos.router';
import promptAction from '@ohos.promptAction';
import { convertMillisecondsToTime } from '../utils/DataUtil';
@Entry
@Component
struct PostHistoryPage {
@State postInfoList: PostInfo[] = []
page: number = 1;
total: number = 0;
onPageShow() {
this.postInfoList = []
this.page = 1
this.total = 0
this.getMyPostInfoList(this.page)
}
async getMyPostInfoList(page: number) {
let response = await getMyPost(page, 10)
response.data.data.records.forEach(post => this.postInfoList.push(new PostInfo(post)))
this.total = response.data.data.total;
this.page += 1;
}
build() {
Column() {
  Row() {
    Image($r('app.media.ic_back'))
      .width(24)
      .height(24)
      .onClick(() => {
        router.back()
      })
    Text('打卡记录')
      .fontSize(18)
      .fontWeight(FontWeight.Bold)
    Image($r('app.media.ic_back'))
      .width(24)
      .height(24)
      .visibility(Visibility.Hidden)
  }.width('100%')
  .height(40)
  .justifyContent(FlexAlign.SpaceBetween)
  .padding({ left: 20, right: 20 })

  Divider()
    .color(Color.Black)
    .margin({ left: 20, right: 20 })

  if (this.postInfoList.length > 0) {
    this.listBuilder()
  } else {
    this.emptyBuilder()
  }

}
.height('100%')
.width('100%')
.padding({
  top: 40
})
}
@Builder
listBuilder() {
List() {
  ForEach(this.postInfoList, (post) => {
    ListItem() {
      this.postItemBuilder(post)
    }.width('100%')
  })
}
.width('100%')
.layoutWeight(1)
.alignListItem(ListItemAlign.Center)
.onReachEnd(() => {
  if (this.postInfoList.length < this.total) {
    this.getMyPostInfoList(this.page)
  } else {
    promptAction.showToast({ message: '没有更多的数据了...' })
  }
})
}
@Builder
emptyBuilder() {
Column() {
  Image($r('app.media.ic_empty'))
    .width(200)
    .height(200)
  Text('暂无数据')
    .fontSize(20)
    .fontWeight(FontWeight.Medium)
    .fontColor('#7e8892')
}.width('100%')
.layoutWeight(1)
.justifyContent(FlexAlign.Center)
}
@Builder
postItemBuilder(post: PostInfo) {
Row() {
  Column({ space: 10 }) {
    Text(post.createTime)
      .fontSize(14)
      .fontColor('#999999')
      .height(21)
    Row() {
      Text('单词数 : ' + post.answeredCount)
        .fontSize(14)
        .fontColor('#1C1C1C')
        .height(21)
        .margin({
          right: 20
        })
      Text('准确率 : ' + (post.rightCount / post.answeredCount * 100).toFixed(0) + '%')
        .fontSize(14)
        .fontColor('#1C1C1C')
        .height(21)
    }

    Text('用时 : ' + convertMillisecondsToTime(post.timeUsed))
      .fontSize(14)
      .fontColor('#1C1C1C')
      .height(21)

  }.alignItems(HorizontalAlign.Start)

  Blank()

  Text(post.createTime.substring(8, 10))
    .width(58)
    .height(58)
    .fontSize(18)
    .textAlign(TextAlign.Center)
    .fontColor('#333333')
    .fontWeight(FontWeight.Bold)
    .backgroundImage($r('app.media.ic_history_date'))
    .backgroundImageSize(ImageSize.Contain)
}
.borderWidth(1)
.padding(10)
.borderRadius(10)
.shadow({ radius: 20 })
.width('90%')
.margin({ top: 10 })
}
}
# 应用信息
## 概述
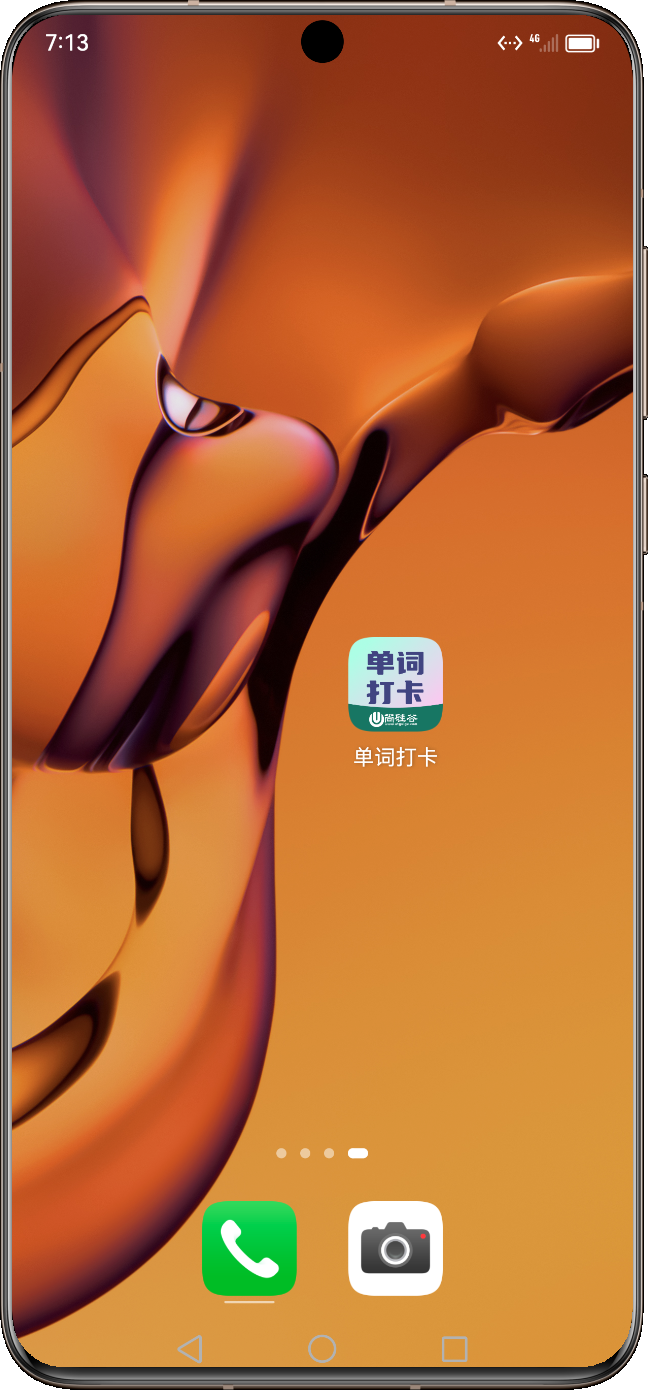
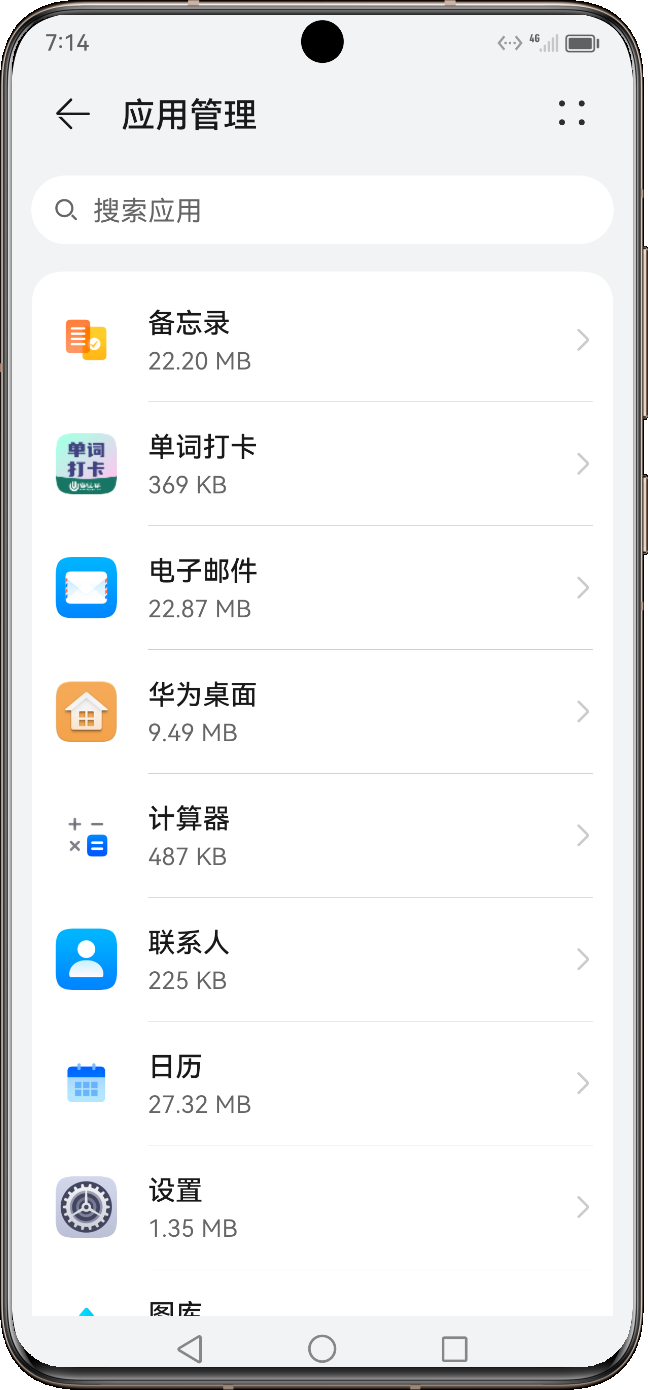
需要修改的信息主要包括应用的图标和名称,如下图所示
|  |  |
| ------------------------------------------------------------ | ------------------------------------------------------------ |
## 实现思路
### 所需技能
:::success
1. 熟悉鸿蒙应用Stage模型基本概念
2. 熟悉基于Stage模型所创建工程的配置文件
:::
> 上述内容可参考[HarmonyOS 4.0 应用开发](www.cqust.ac.cn/index.php/archives/34/)中的第15章。
### 实现思路
在鸿蒙应用中,桌面上启动应用的图标以UIAblitity为粒度,支持同一个应用存在多个启动图标,点击后会启动对应的UIAblitity,因此桌面图标需要在`module.json5`文件中的对应的Ablitity中进行配置。